GM guide
How-to guide. Each section is one task. For what a control means, read the GM reference. If you are new to the app, do the first session tutorial first.
Each task in this guide starts with the app open in a browser, in the GM role. To start the app, follow Local setup on the documentation home page.
The header has two switches that control what you see. The mode switch selects Play, Build, or Library. The role switch, with the label Viewer, selects GM or Player. If a control in a task does not show, set the mode that the task names and set the role to GM.
Start a campaign
Start from nothing
On the first visit, with no saved campaign, the app opens with one empty world map. To start again later:
- Click New in the header.
- Click New campaign in the confirmation.
The app replaces the current campaign and its save. The confirmation says whether Undo can restore the old campaign.
Start from the example campaign
- Click Load example in the header.
- If a confirmation opens, click Load example in it.
- Switch to Play mode and move the party to see how the parts fit together.
The example campaign in the GM reference describes its world, story, and party.
Start from a file
- Click Import in the header.
- Pick a
.jsonfile that you exported earlier. - Click Import in the confirmation. The app asks only when a campaign is already open.
- If the file contains library customizations and you already have your own, the app asks whether to replace them. Click Replace to use the ones from the file, or Cancel to keep yours.
The campaign imports in both cases, and the page reloads. If the file is not a campaign file, a message says so and nothing changes.
Save and back up
- Click Save, or press Ctrl+S (Cmd+S on a Mac). The line under the title reads “Unsaved changes” until the next write, and then “Saved just now” or the minutes since the last write.
- Before a large edit, click Export. The browser downloads the whole
campaign as a
.jsonfile. The file also contains your library customizations, so one export moves both. - Keep the exported file in a safe place. It is the only copy outside this browser.
To go back one step, click Undo in the header. Undo goes back to the state before your last Save, New, Load example, or Import. Redo goes forward again.
- If you save after you undo, the app discards the steps that Redo could restore.
- If you have unsaved changes, Undo and Redo ask first, because the step discards those changes.
- In Build mode, Ctrl+Z (Cmd+Z) undoes the last paint stroke instead. See Paint tiles.
Drive a player-facing display
A Player tab shows the world as your players see it: no GM notes, no exact HP for foes, and only the tiles that the party has revealed. Its log shows a version of each GM-only line without the secret number, such as the total of a Sleep pool or the save bonus of a foe.
- Click Save in your GM tab. Other tabs show only what you saved.
- In the Party panel, click Spectator tab below the
roster. A new browser tab opens in the Player view. You can also add
?role=playerto the URL of a tab yourself. - Put that tab on the display that faces the table.
- To lock the tab when it has no URL parameter, click the padlock beside the role switch in that tab, then click Lock.
A locked tab hides the role switch. It cannot show the GM view again until you close the tab or remove the URL parameter.
Warning: The Player view is a display setting, not a security control. Each tab of the same browser reads the same saved campaign. A person at that browser can open the developer tools and read the whole save. The save contains the fog, the tile notes, the hidden handouts, and the exact HP of each foe. The same person can also remove
?role=playerfrom the URL. Put a player-facing tab only on hardware that you control, such as a second screen or your own laptop.
Limits of the Player view in the GM reference gives the full list.
Let one player run their own character
A Player tab can bind to one character. The player can then spend that character’s slots and resources, set conditions, and use, give away, or discard carried items.
- In the Party panel of your GM tab, find the row of the character.
- Click the open-tab icon on that row, an arrow that leaves a box. A
middle-click also works. A new tab opens with
?role=player&character=<id>in the URL. - Give that tab to the player.
The id is the name of the character in lower case, with each run of spaces
and punctuation changed to one hyphen. For example, Wren Tallowby has the id
wren-tallowby. If two characters have the same name, the second one gets
a -2 suffix. The exported campaign file lists the id of each character.
A player in a Player tab with no binding can pick a character from the Playing as list in the Party panel.
Recover their resources yourself. A player can spend a slot, but only the GM can restore one.
Only one tab at a time can play a given character. This rule stops two tabs from changing one character by accident. It does not stop a player who opens the developer tools of the browser.
Build a world
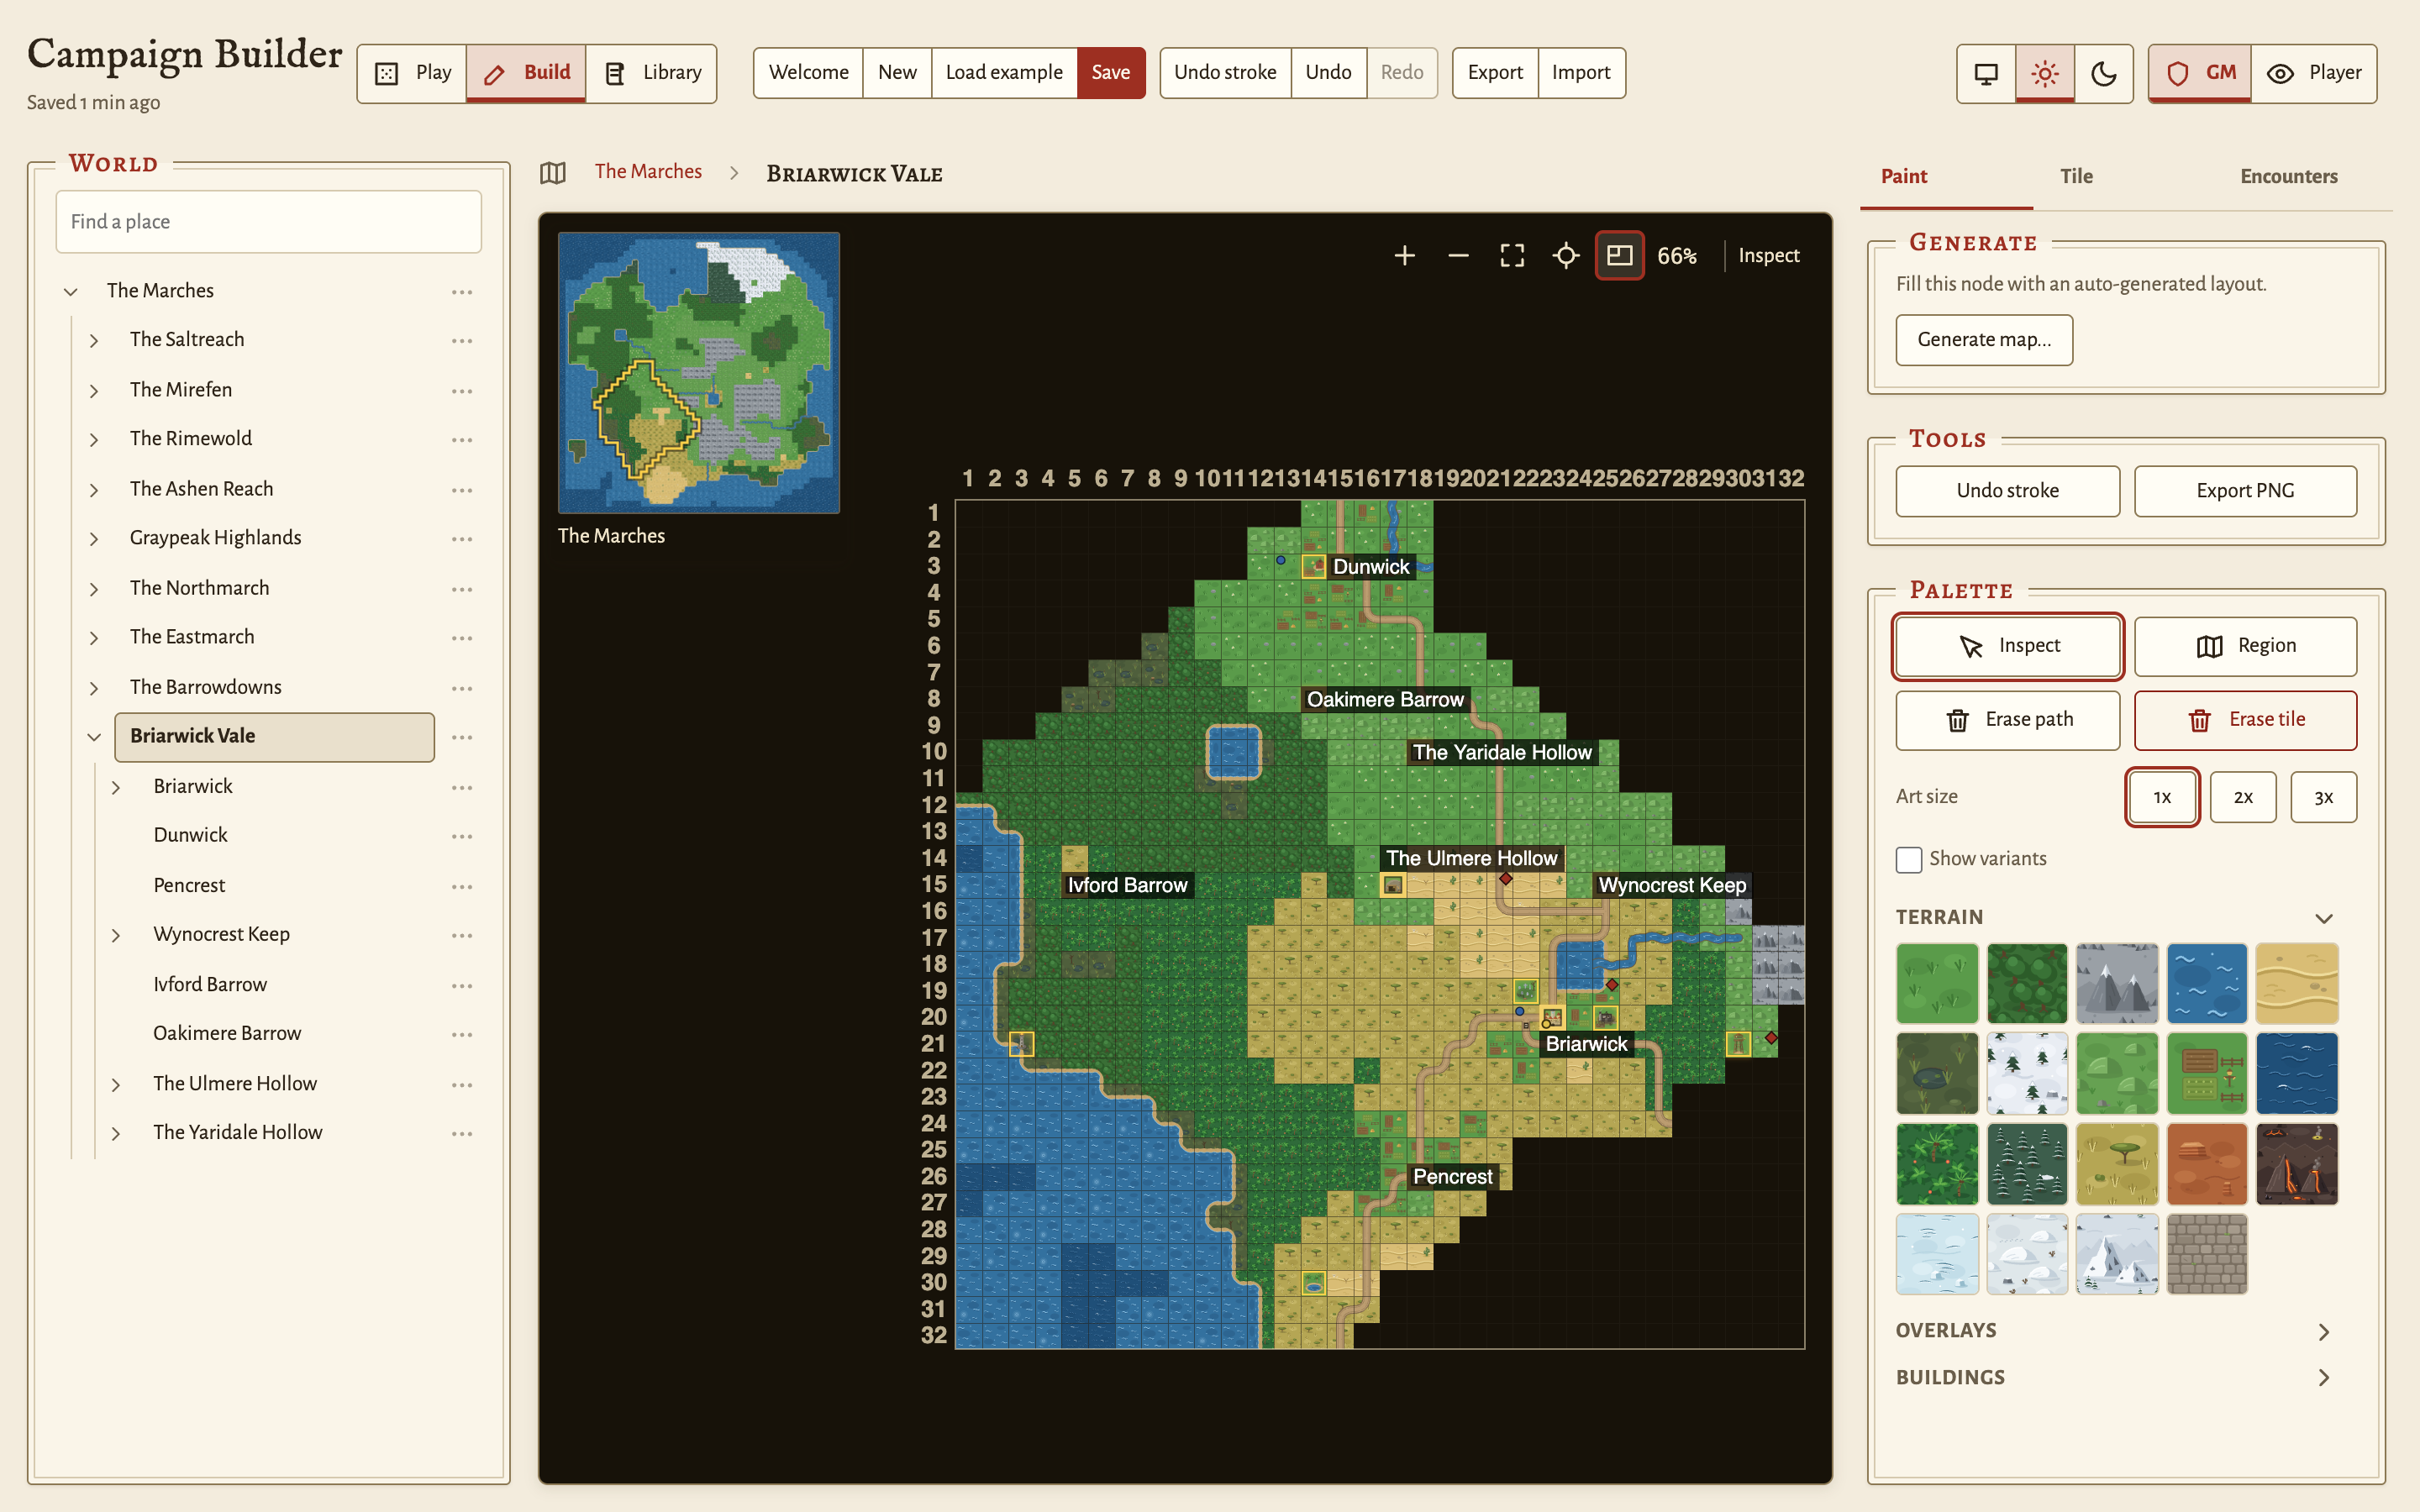
Switch to Build mode. The world tree is on the left, and the editable map is in the center. The rail on the right has three tabs:
- Paint has the Generate card, the Tools card, and the Palette.
- Tile has the tile inspector.
- Encounters has the Foes and NPCs lists.
Add a node
A node is one map. A node can be a region, which is an outdoor map, or an interior, such as a building or a dungeon level.
- In the World tree, click the actions button (three dots) on the parent node.
- Click Add a child.
- Type a Name, and set Width (tiles) and Height (tiles).
- Set Kind to Region or Interior.
- Set Environment, for example Grassland, Cave, or Inn.
- Click Create.
The new node opens on the map, and the tree opens its parent and selects its row. Nothing leads into it yet, so link a tile to it (see Paint a region so the party can zoom in).
To change a node later, click Edit settings in the same menu. If you make the node larger, the app keeps the existing tiles. If you make it smaller, the app removes the tiles outside the new size, and it asks first when that removes painted tiles.
Lock a map
- In the World tree, click the actions button on the node, and then click Edit settings.
- Set Lock to Locked.
- In Key item (name), type the name of the item that opens it, for example “Warding Key”. Leave it blank for a lock that only you open.
- Click Save.
When the party tries to enter, a dialog tells you who carries the key. Click Unlock to let the party in. Click Stay out to keep the lock shut. A party that walked to the link then stops one tile short of it.
Paint tiles
- Open the Paint tab of the right rail.
- In the Palette, click a section heading, such as Terrain, Overlays, or Buildings, to open it.
- Click a swatch to pick it as the brush.
- Drag across the map with the left mouse button. Each cell that the pointer crosses gets the brush. A click paints one cell.
- To clear cells, pick Erase tile and drag. To remove only a road or a path and keep the ground below it, pick Erase path.
- To take back the last stroke, click Undo stroke in the Tools card, or press Ctrl+Z (Cmd+Z). A whole drag counts as one stroke.
The palette shows only the sections that the node kind can use. An interior shows Interior and Furnishings. A region shows Terrain, Overlays, and Buildings.
A terrain swatch such as Grass (random variant) mixes the variants of that terrain. Each cell always gets the same variant from this swatch, so a second coat does not change it. To paint one exact variant, select Show variants and pick that swatch.
To make a landmark stand out, set Size to 2x or 3x before you click. One click then draws one tile across a 2x2 or 3x3 block. Roads and the erase tools ignore Size.
On the map, the left button paints, a drag with the right button pans, and the wheel zooms.
Generate a map instead of painting it
- Open the node in the World tree.
- In the Paint tab, click Generate map… in the Generate card.
- Pick an Archetype and a Size. The dialog shows a preview of the exact layout. When tiles of the parent map link to the node, Size starts on the size that fits those tiles, and an outdoor map follows the land that they show.
- Click Reroll until you like the preview. Each reroll picks a new Seed.
- For a dungeon with more than one level, set Levels. Each level becomes a child node, and stairs join the levels. A stack has at most 10 levels.
- For a region or a world, set Sub-maps to also build the maps of the places on the new map. One level down builds the maps of the places on this map. Every level goes down to the buildings of each town.
- Click Generate.
If the node already has tiles, the app asks before it replaces them. The replacement also removes the sub-maps that the old tiles led to. A message confirms the result and gives the seed. To make the same layout again, type that number into Seed.
The archetypes in the list depend on the node kind. A region offers climates such as Wilderness or Desert, a Town, and a World. An interior offers dungeon and castle layouts. Map generation in the GM reference describes each one.
If nothing on the parent map links to this node, the app adds an entrance tile near the center of the parent. A message tells you where it is. To move the entrance, repaint or relink that tile.
If a parent tile already links to the node, the app changes the marker of that tile to match the new archetype.
A world region has no marker. Instead, a generated region name such as “The Ashford Hills” changes to the name pattern of the new archetype, such as “The Ashford Sands”. Its block on the world map takes the ground of the new climate.
To take back a generation, click Undo stroke once. This also removes each sub-map that the generation made.
Mark a point of interest
- In the Paint tab, pick the Inspect tool.
- Click the tile. The Tile tab opens with the tile inspector.
- Set Marker, for example Settlement or Dungeon.
- For a secret, select Discoverable. The marker stays hidden until the party steps onto the tile. On a tile that links to a sub-map, the party discovers it when it walks through the tile.
- Type your own text in Notes.
The Player view does not show the notes. In Play mode, you see them when you hover over the tile. The notes are part of the saved campaign, so a player with the developer tools of the browser can read them.
Set where the party starts
- In the Paint tab, pick the Inspect tool.
- Click the tile.
- In the tile inspector, click Set party start here.
Paint a region so the party can zoom in
A region link makes a tile lead into a child node. When the party walks onto the tile, the map changes to the child.
- In the Paint tab, pick the Region tool.
- In Paint region, pick the child node to link. To make a new child node, click New.
- Drag over the tiles of the region. Each tile that you cross now leads into that child.
If the node has no child nodes, the first stroke asks you to make one.
A tile belongs to one region only. If you paint over a tile of another region, the tile moves to the region that you paint. To remove the link of a tile, pick No region (clear link) and paint over it.
The Region tool does not change a site entrance, such as a point-of-interest marker, a door, a staircase, or a link to an interior. A message tells you when a stroke skips one.
To link one tile instead, select it with Inspect. In the tile inspector, pick the child in Zooms into, or click New region here. On an outdoor map, this makes a 2x2 block from the tile and its right and lower neighbors. At the map edge, the block moves inward. An interior keeps links of one tile, because a stair or a door is one cell. When you remove the link of one tile in a block, the app removes the link of the whole block.
You do not make the way back out. An outdoor sub-region leads out on each side that touches painted tiles on the map above. An interior leads out through an outer door, or through the staircase that joins it to the level above or below.
Fix a broken link
Build mode warns you when the party cannot get into a node or out of it.
- Look for a warning triangle in the World tree, or a warning below the tabs of the right rail. On a closed branch, the triangle has a number that counts the warnings inside it. Open the branch to find the node.
- If the warning reads “Nothing leads here”, click Link from (parent). The parent map opens with the Region brush set to this node. Paint the tiles that lead here.
- If the warning reads “No way out” on an interior, paint an outer door or a staircase.
- If the warning reads “No way out” on an outdoor sub-region, paint a tile on the parent map beside the block of the region.
The warning goes away when the link is fixed. Link warnings in the GM reference lists each warning.
Run a session
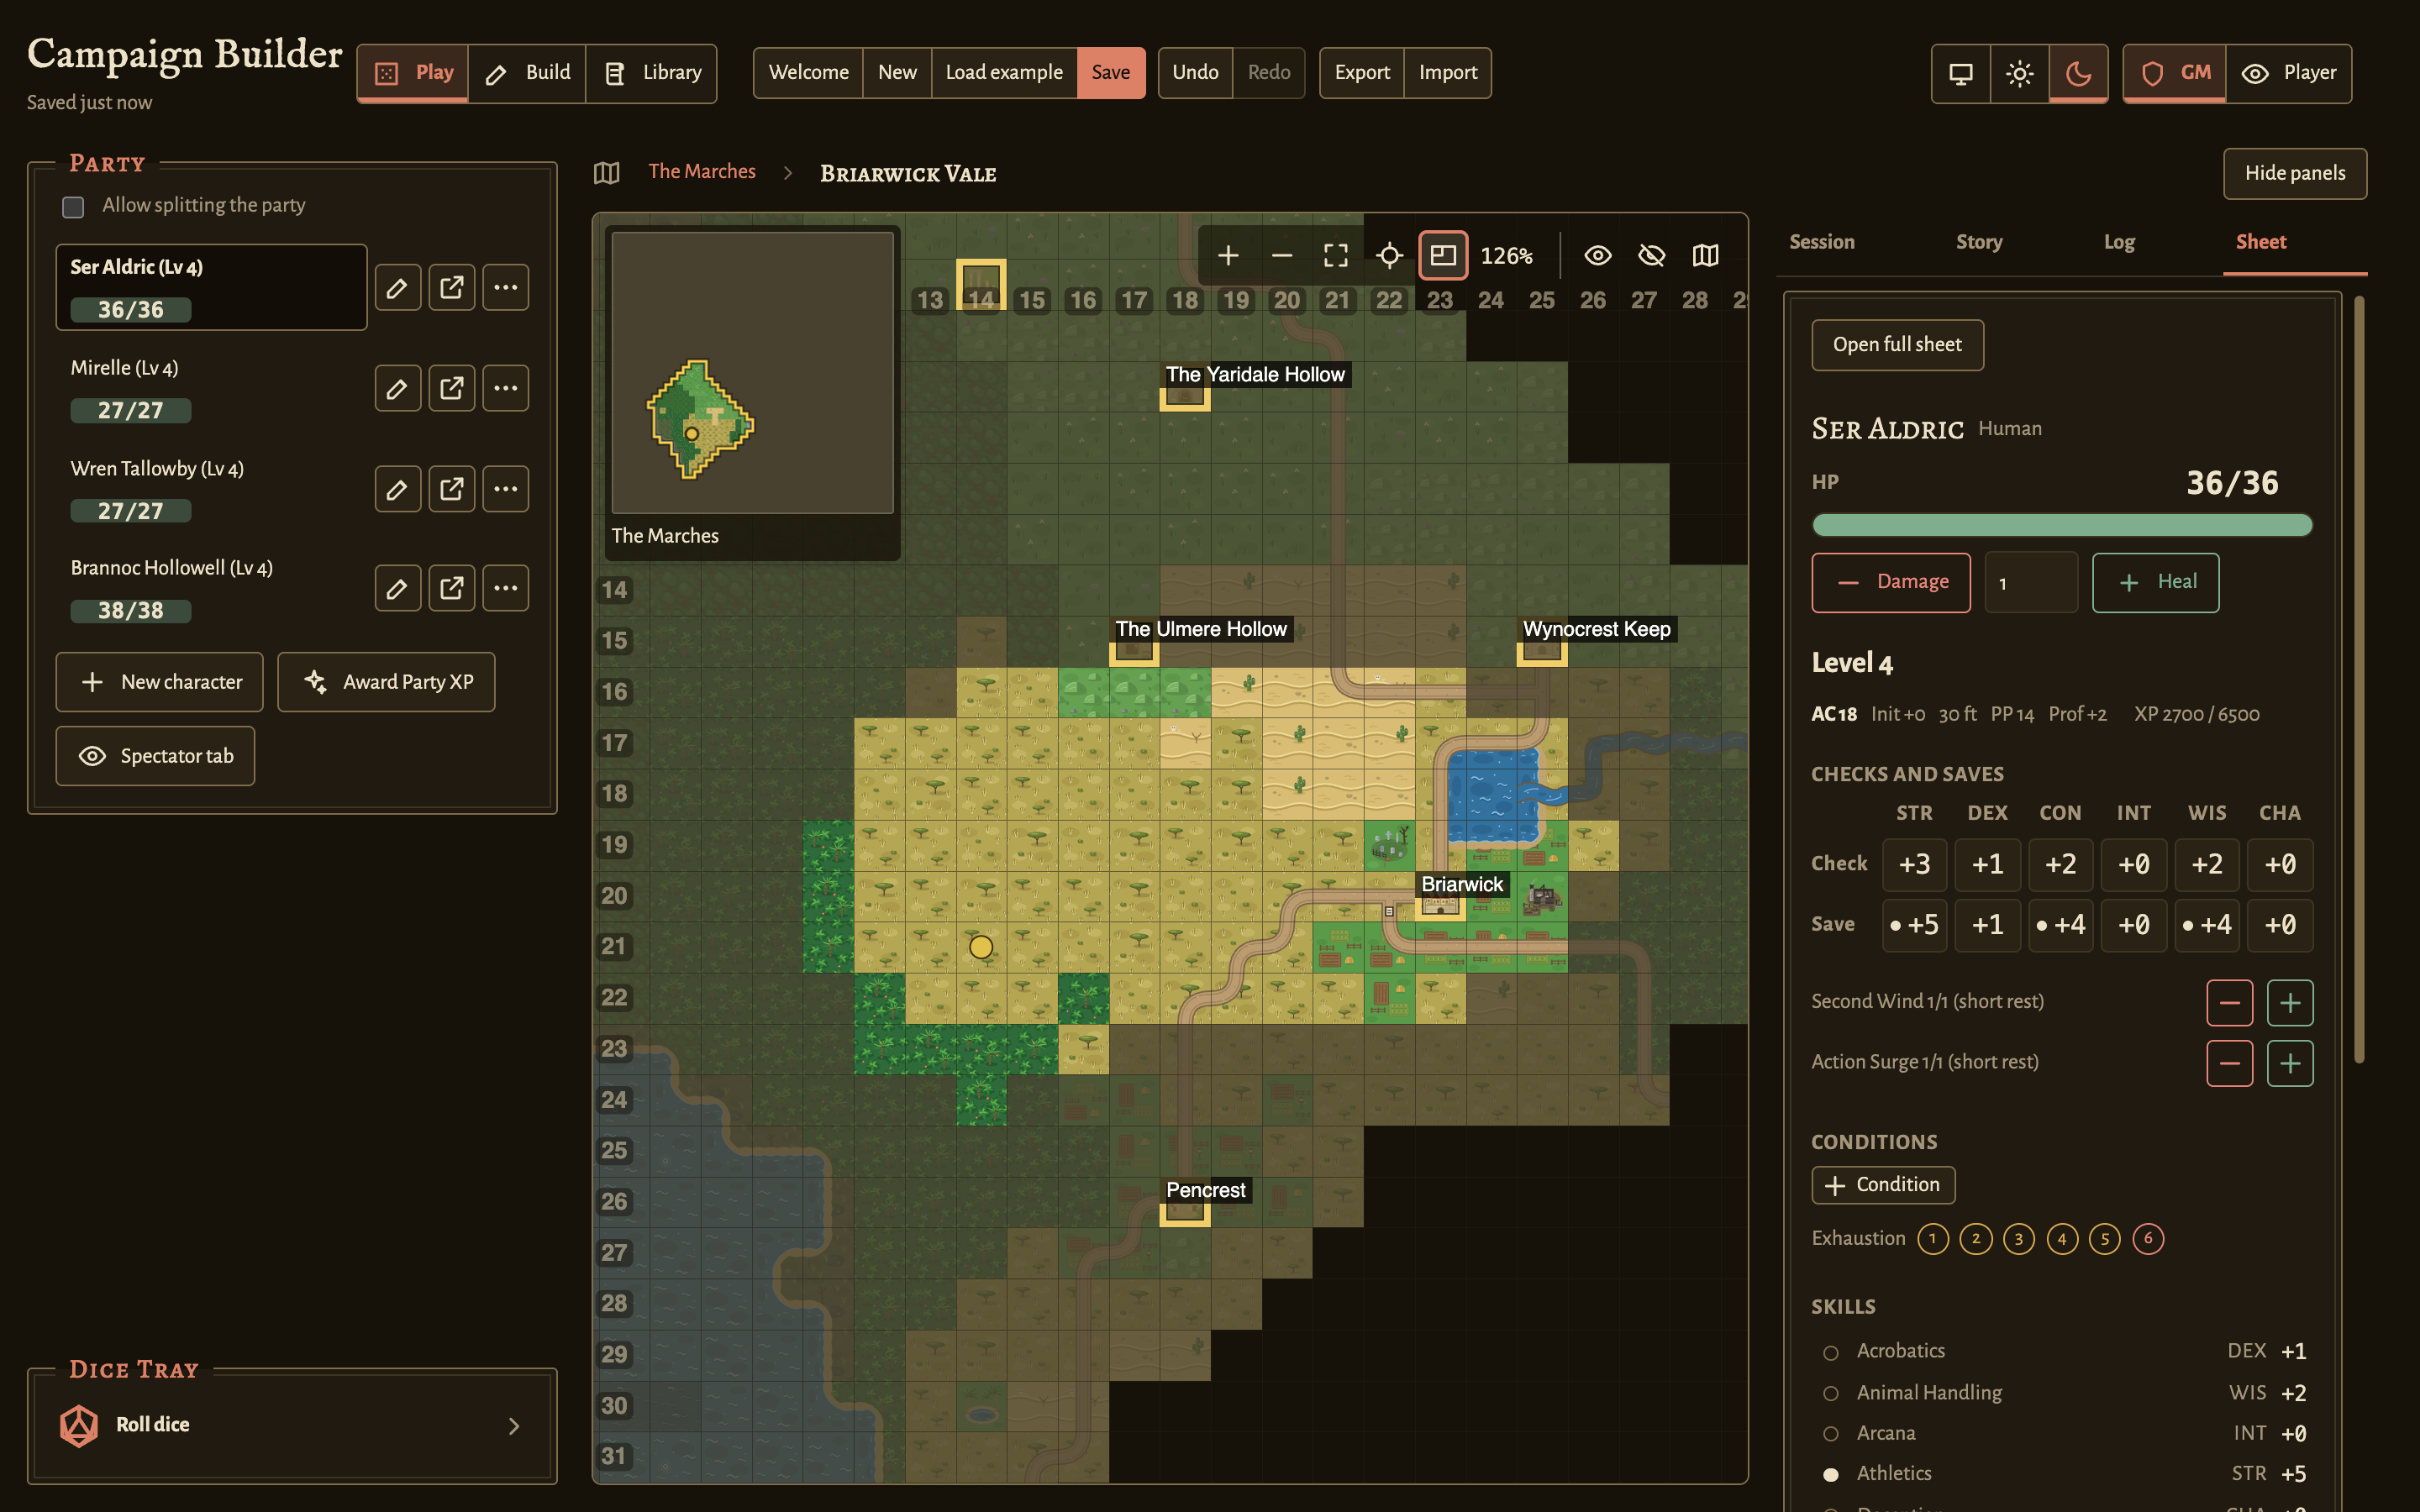
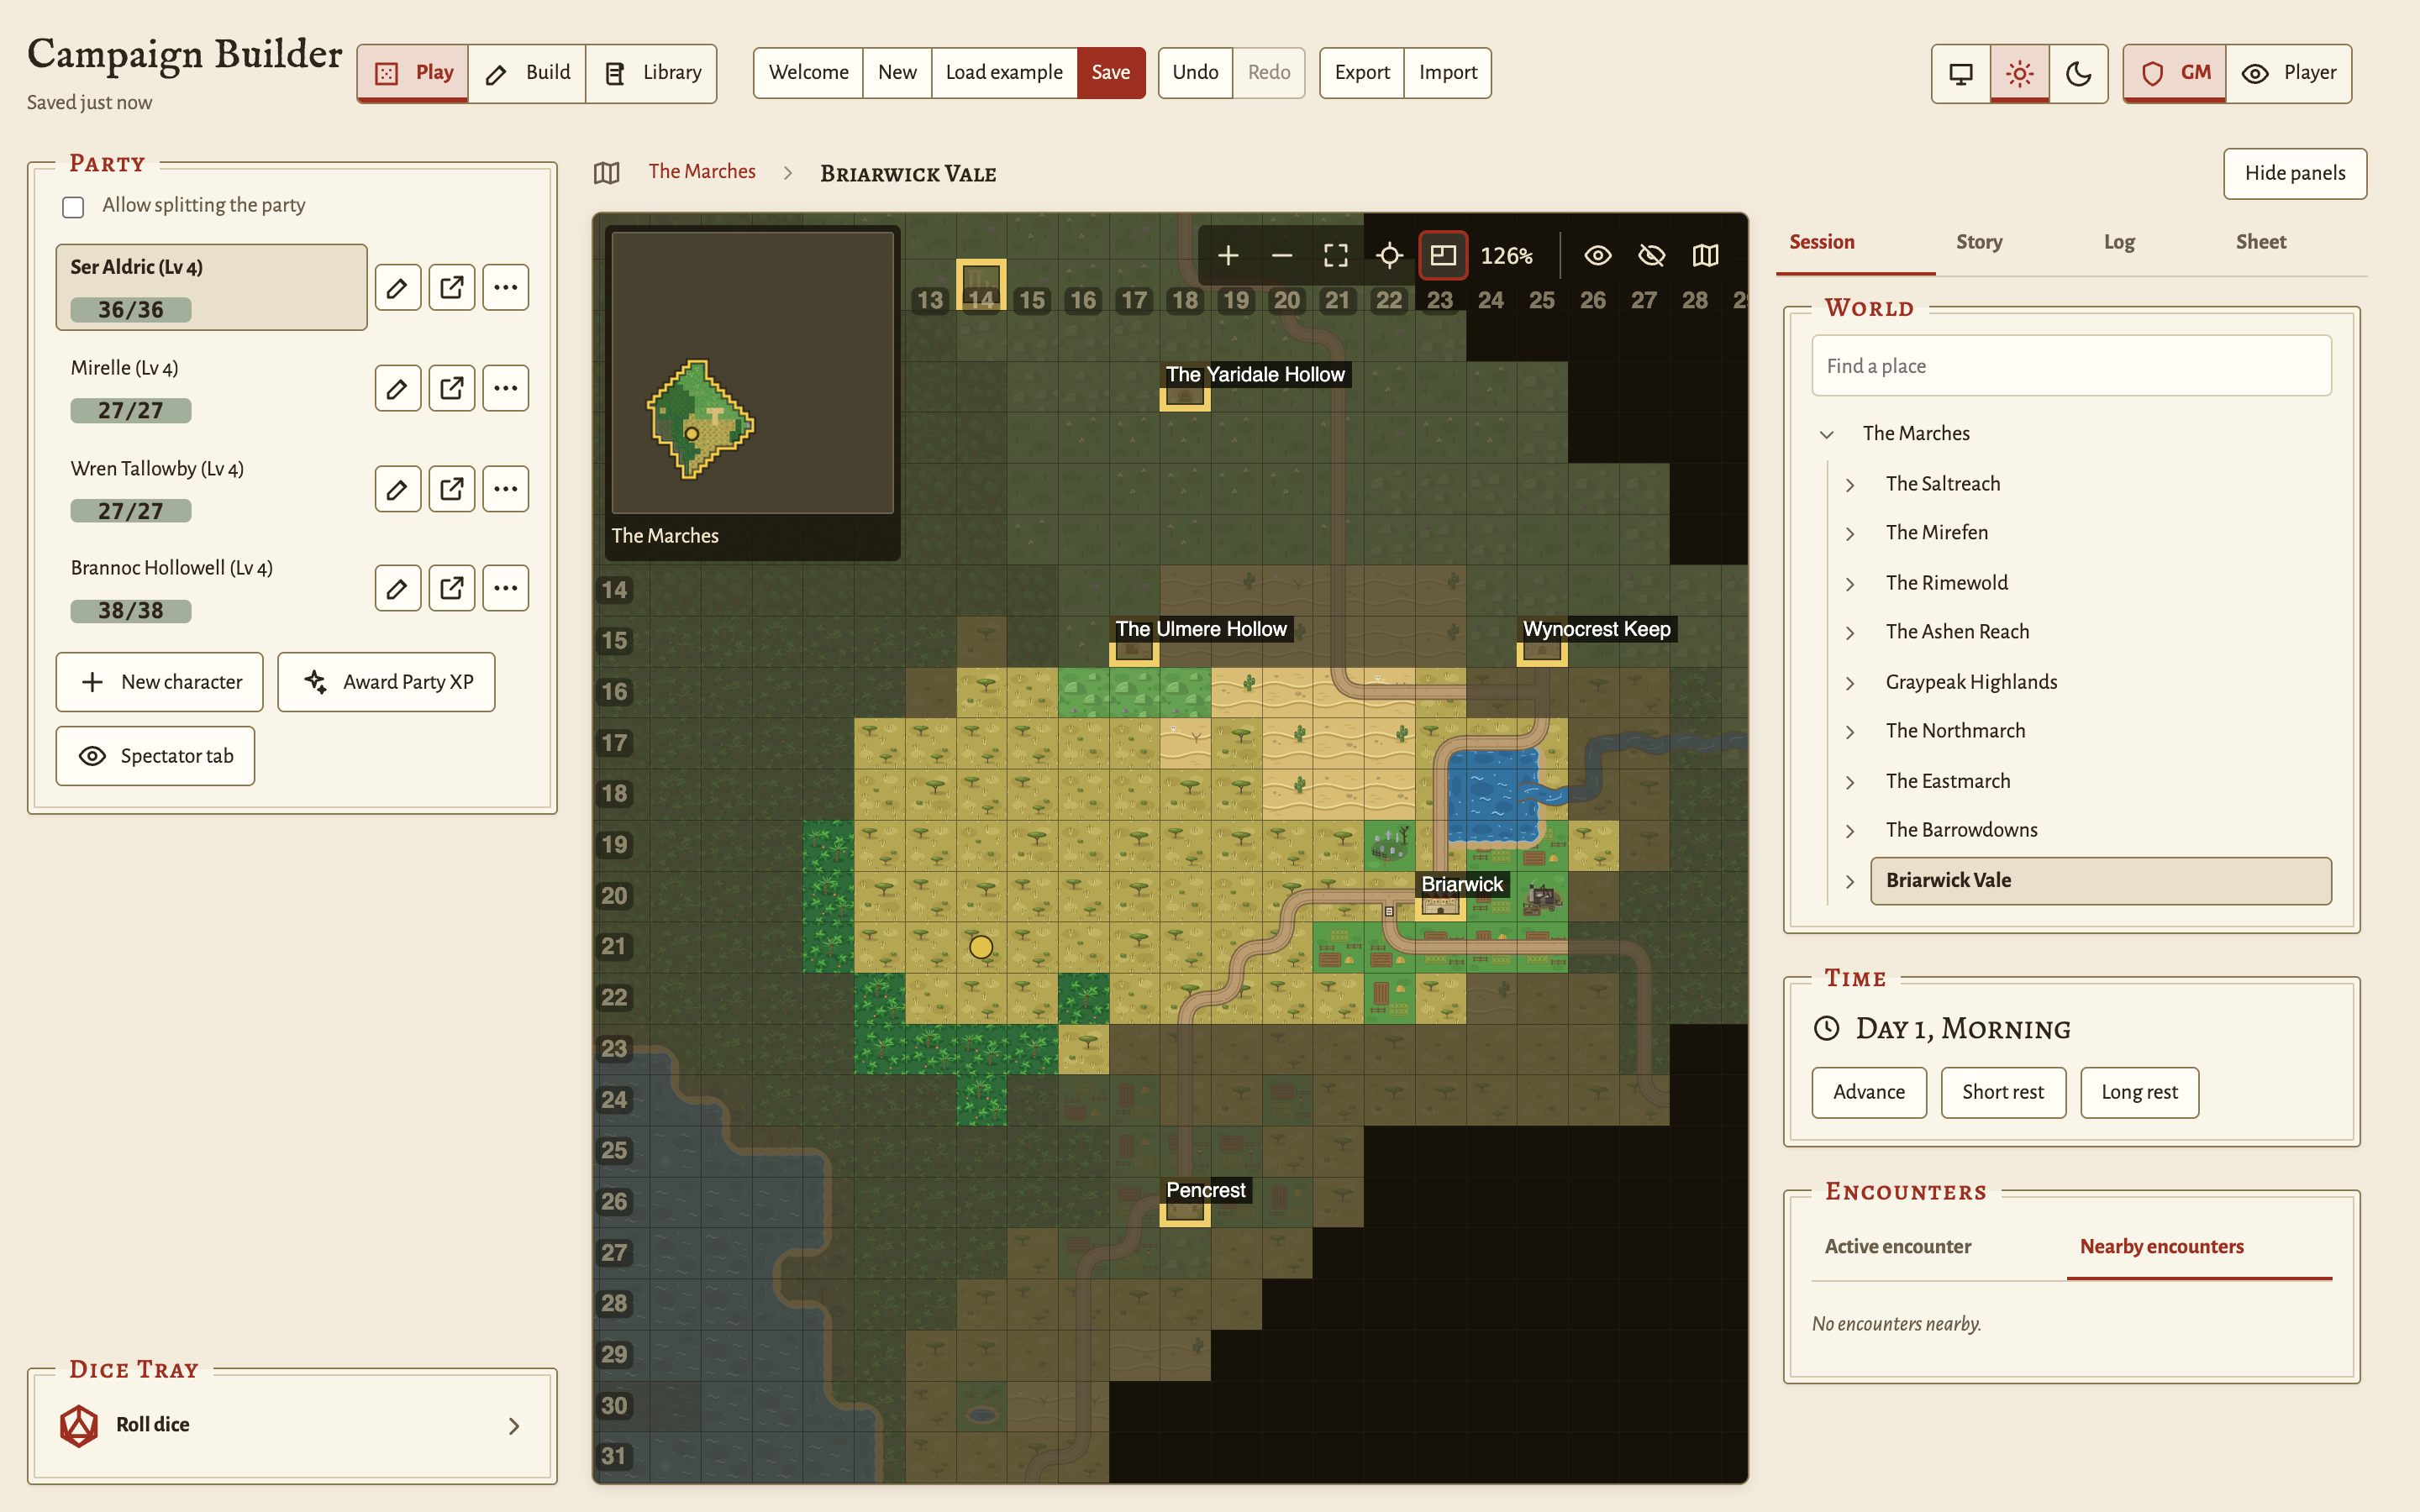
Switch to Play mode. The Party panel and the dice tray are on the left of the map. The sidebar on the right has the Session, Story, Log, and Sheet tabs. To hide the sidebar and widen the map, click Hide panels.
Move the party
- Click a tile. The whole party walks there, and the fog clears along the walk. Walking on a region map moves the in-game clock on (see Party movement).
- To move with the keyboard, click the map, move the cursor with the arrow keys, and press Enter or Space.
- To go into a region or a town, click a tile that links to it.
If walls, obstacles, or deep water block every path to the tile, a dialog asks before the party moves. Click Move anyway to put the party there, or Cancel to stay. A click on a wall itself moves nobody.
If you click a fogged tile that leads into a building or another sub-map, a dialog names the sub-map. Click Enter to go in, or Cancel to stay.
Split the party
- At the top of the Party panel, select Allow splitting the party. Each character now has a separate token on the map.
- Click a character in the roster. Your clicks on the map now move only that character.
- To move a character to a map that is not on screen, click the map button on their row (Place on map). Pick a map and a tile.
- To send a character back to the party, click the tile of the party.
- To bring everyone together, clear Allow splitting the party.
- In Teleport everyone to, pick the character whose position the others move to, and click Regroup.
Reveal or hide fog by hand
- In the map controls, click Reveal fog (brush).
- Click or drag across tiles to reveal them.
- To hide tiles again, click Hide fog (brush) and use it in the same way.
- To put the brush down, press Escape.
To reveal a whole map at once, click Reveal whole area, and then click Reveal in the confirmation. The Player view does not show these controls.
Leave a sub-region
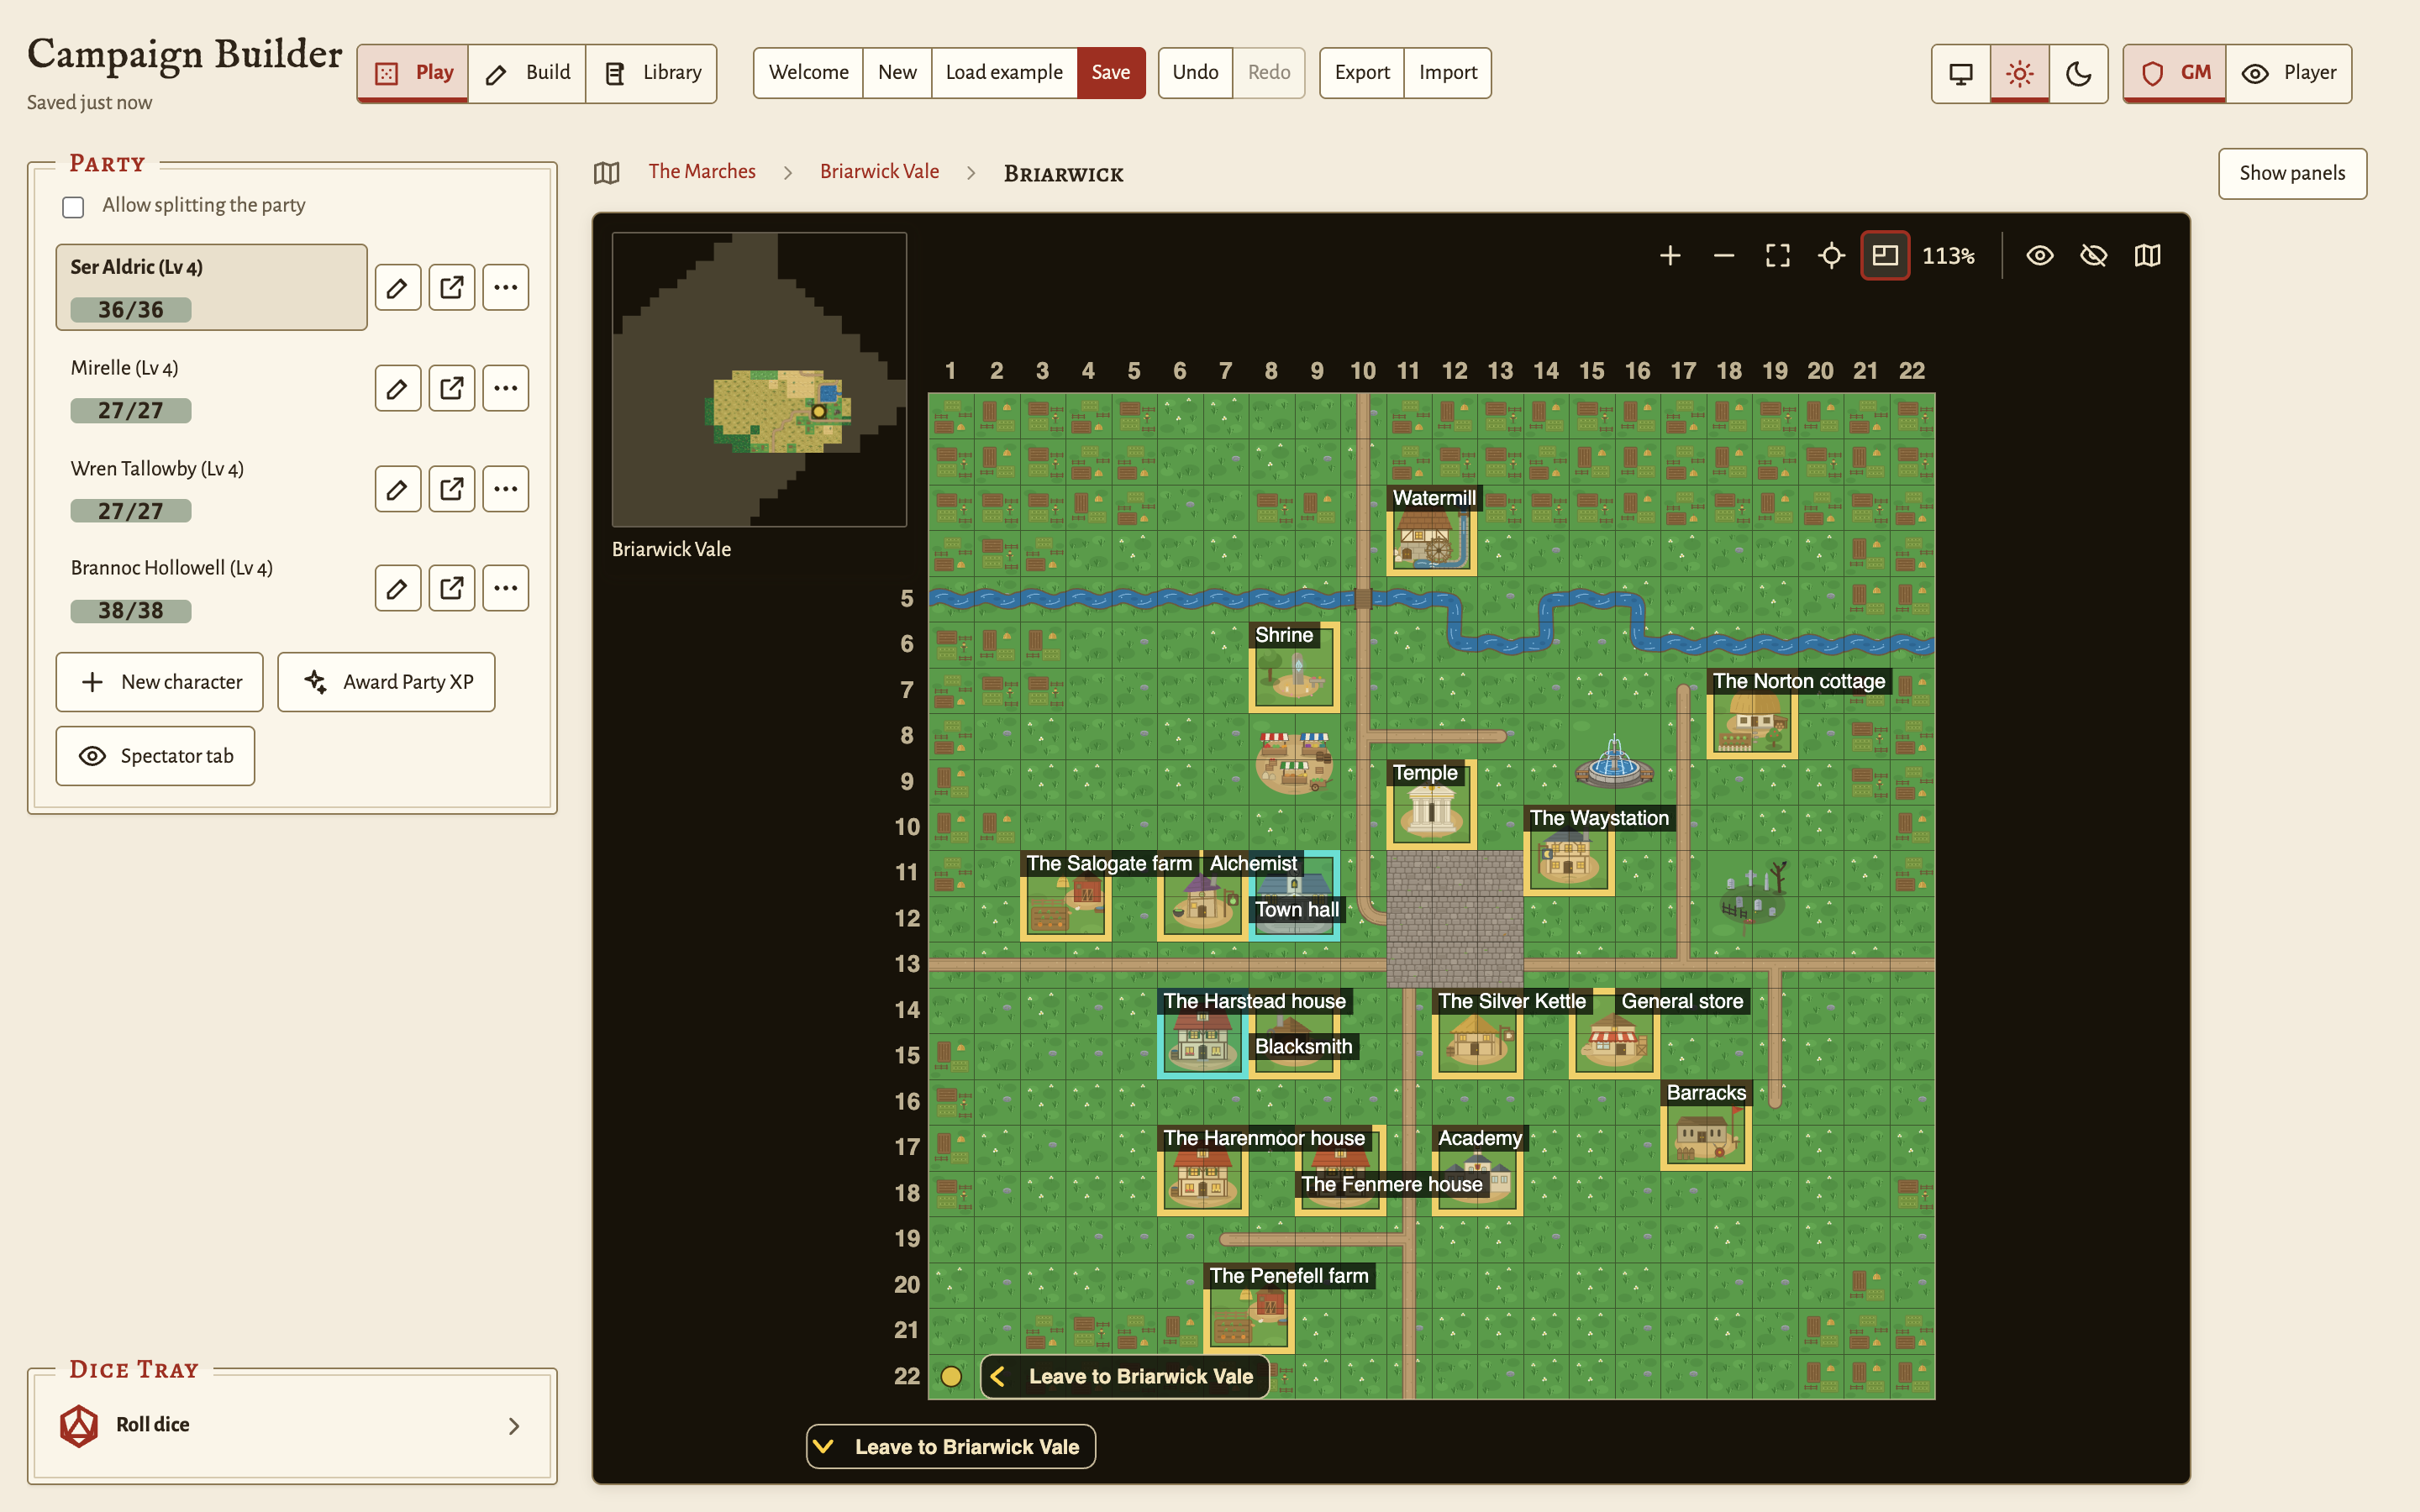
- Find a way out. An arrow at the edge of the map reads Leave to and the name of the map above. The arrow shows when the party is at most three times its sight from that edge, so walk toward an edge to find it. A door or a staircase that leads out has a chevron badge.
- Click the arrow, or click the door or the staircase.
A click on a door or a staircase walks the party to it and out in one click. The party walks out onto the map above. It stands beside the tile that links to the sub-region, on the side of the exit that it used. From a door, the party stands beside the tile that it came in through.
To leave with the keyboard, press an arrow key toward the edge twice. The first press lights the exit, and the second press walks out.
If the arrow reads Cross into and the name of a region, another region is beyond that side of the map. The party walks straight into that region, at the spot that matches where it left. The arrow label changes as the party moves. Walk along the edge to find the part that leads to each region.
Stage an encounter
- Switch to Build mode and open the map for the encounter.
- In the Paint tab, pick Inspect and click the tile for the encounter.
- Open the Encounters tab, then the Foes tab.
- Click New creature. The New creature dialog opens, with the selected tile already set as its location.
- Set Name, Creature type, Max HP, Level, and Tier. The tier and the level set a default stat block and default gear. The type decides which spells affect the foe: Sleep passes over undead, and a healing spell has no effect on an undead or a construct.
- Set Challenge rating, and select the saving throws and skills that the foe is trained in. The rating feeds the difficulty hint, and it sets the bonus that the foe adds to each save and check. To leave a foe out of the difficulty hint, keep the rating at Unrated.
- Change Weapon and Armor if you want. For a beast that has no weapon or armor, pick None (unarmed) or None (unarmored).
- To place the encounter elsewhere, change Location (map), Column, and Row. You can also click Pick on map and then click the tile on the map. The dialog opens again with the tile filled in.
- Click Add.
The foe shows in the Foes list and on its tile. You can also right-click a tile in Build mode and click New foe here.
To change a staged encounter later, click the pencil on its row. The edit keeps its current HP, stat block, and conditions.
Reuse a foe
A bestiary template is a saved copy of a foe that you can place again.
- In Play mode, find the foe in the Encounters panel.
- Click the save icon on its row (Save as template). The app stores the foe as a campaign template.
- To place a copy, switch to Build mode. In the Foes list of the Encounters tab, click From bestiary.
- Pick the template, or an entry from the library. To find one in a long list, type part of its name in Filter by name.
- Set Count to the number of copies, set the map and the tile, and click Add.
Each copy starts at full health on the tile that you picked. A template is a snapshot, so later edits to the live foe do not change it. To remove a template, click Remove template in the same list, pick it, and click Remove. Then click Delete in the confirmation.
Clear defeated foes
- Switch to Build mode and open the map that has the defeated foes.
- Open the Encounters tab, then the Foes tab.
- Click Clear defeated (N). N is the number of hostile creatures at 0 HP on this map. The button shows only when N is more than zero.
- Click Remove in the confirmation.
The foes leave the campaign, and the travelogue records a note that names them. Foes on other maps and unplaced foes stay. A foe in a fight that is still open stays until you end the fight. To bring the foes back, click Undo in the header.
Run a fight
- Move the party onto or next to a tile with a live hostile creature. A dialog that reads Encounter! names each hostile creature on the tile of the party and on the eight tiles around it. A friendly or neutral creature opens no dialog, and it stays in the NPCs panel.
- Click Set up combat to go straight to step 5, or click Not now.
- In the Encounters panel, open the Active encounter tab. It lists the same hostile creatures, and it shows Start combat whenever it has a row. Above the rows, one line rates the fight against the XP budget of your party. Players never see this line.
- Click Start combat.
- In the Set up combat dialog, click Roll initiative, or type the
values yourself. The hostile creatures of the Active encounter tab join
the foes. A friendly or neutral creature on the tile of the party joins
the party.
- To bring in a foe from farther away, such as a second wolf two tiles off, tick Join on its row under Add nearby foes. For a pack on one tile, tick Add the whole group above its rows. In a running fight, open its line in the Nearby encounters tab, and click Add to fight on its row instead.
- If one side sneaks up on the other, set Who sneaks to that side, or to Both sides when each side sneaks, and click Roll Stealth or type each Stealth total. The app ticks Surprised on each watcher whose passive Perception notices no one. See Stealth contest.
- If the party talks its way out, click Parley instead. No fight starts, the foes become neutral, and the travelogue records the parley. See Parley.
- Click Start combat. The app rolls for each row that you did not roll or type, and the combat screen replaces the map.
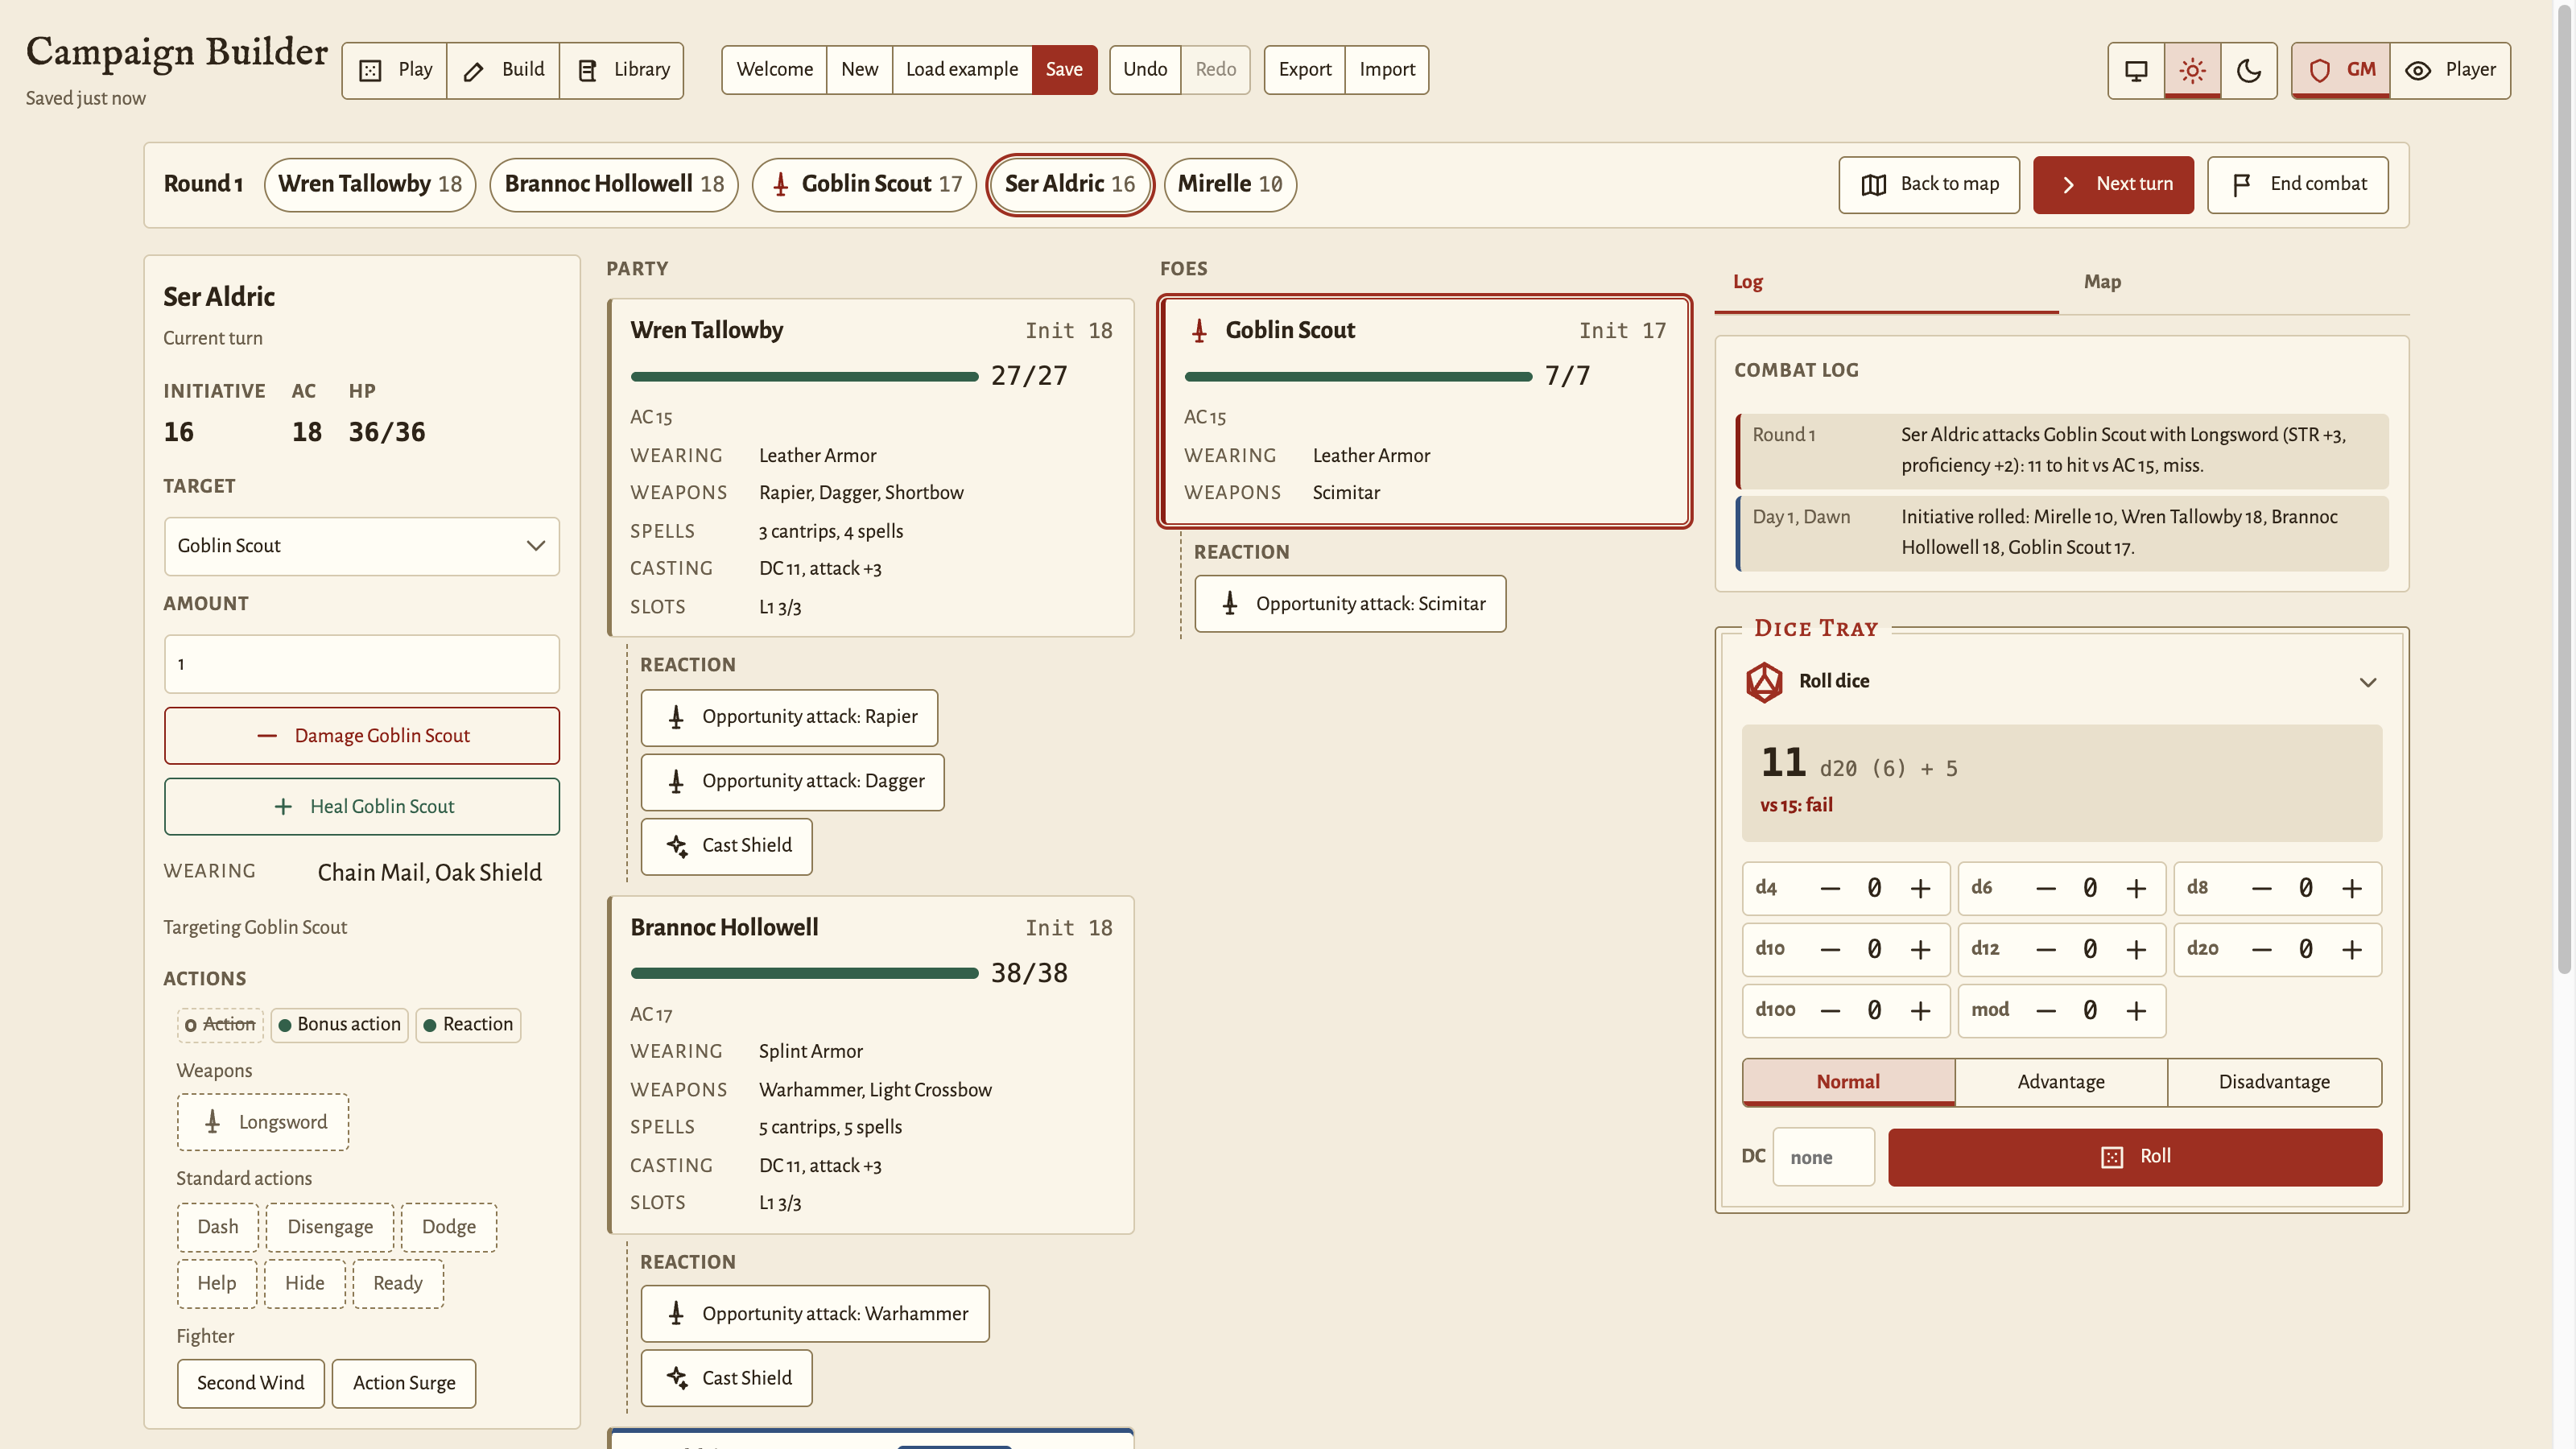
- Click a board card to make it the target. Click it again to clear the target.
- In the left column, click a weapon to attack, or a spell to cast. The dialog opens with the target already set, so Enter rolls it.
- For a bonus die, a penalty die, or a flat bonus, open Situational modifiers in the dialog.
- Click Next turn to go to the next combatant. Timed conditions count down each round.
- When the fight is over, click End combat.
- In the End the fight and award XP dialog, pick a choice for each foe that still stands: Still hostile, Surrendered or captured, or Fled. Check the value, and click End and award. Each character gets that amount. To keep fighting, click Back to the fight.
When the last foe drops, a banner at the bottom of the screen announces the victory, and the fight stays open. The party can heal, and everyone can read the log before you end it. The party can also attack a creature on its own side, for example a bystander that the party turns on. To start a fight with a friendly or neutral creature, first set its disposition to hostile in the creature dialog.
To leave the combat screen without ending the fight, click Back to map. To return, click Open combat in the Initiative card of the Session tab. Combat screen in the GM reference describes each area of the screen.
Run a legendary creature
- In the creature dialog, type Legendary actions per round and Legendary resistance per day from the stat block.
- In the fight, when the turn of another combatant ends, look at the card of the creature. The row Legendary action (N left) has one button per weapon.
- Click a weapon to attack. The swing spends one legendary action. Do this before you click Next turn.
- When the creature fails the save of a spell or of Turn Undead, a dialog asks whether it uses legendary resistance. Click Succeed instead to spend one use.
The legendary actions come back when the turn of the creature starts. The uses of legendary resistance come back when the party takes a long rest. See Legendary actions and Legendary resistance.
Adjust a stat for a few rounds
- In Play mode, find the row of the creature in the Encounters panel.
- Click a stat chip, for example STR 14.
- Type the Adjustment (+/-), for example
2. - Type the number of rounds in For rounds.
- Click Apply.
The chip reads “STR 14→16 (3r)” and counts down as rounds pass. In Build mode, a click on a chip sets the base value instead.
Distance, range, and cover
The app does not measure distance between tokens. Movement, range, reach, and the area of a spell are your decisions at the table. Each decision has a control that applies it to the rolls.
| Situation | What you do |
|---|---|
| Movement | Tell the players who stands where. The speed badge on the sheet shows the walking speed of a character. Move the party token when the group changes tiles. The app does not count movement. |
| Long range | If a shot is past the normal range of the weapon, set Range in the attack dialog to the long option. The roll has disadvantage. |
| Cover | If something is between the attacker and the target, set Target cover in the attack dialog. Half cover adds 2 to the AC of the target, and three-quarters cover adds 5. If the target has total cover, do not roll. |
| Reach and opportunity attacks | Decide who is in reach. When a creature leaves the reach of an enemy, click a weapon in the Reaction row under the card of that enemy. |
| Area spells | The cast dialog lists the combatants that the spell can reach, up to its target count. Decide who is in the area, then pick those combatants. |
| Anything else | Open Situational modifiers in the roll dialog. A bonus die, a penalty die, or a flat bonus covers a ruling that no other control names. |
Track characters
Create a character
- In the Party panel, click New character.
- Type a Name.
- Pick a Race, a Class, and a Background. For a race that is not in the list, type it in Custom race.
- Pick how to set the ability scores: Point buy, Standard array, Roll 4d6, drop lowest, or Custom scores. Then set the scores.
- Pick the skills that the class offers.
- Submit the dialog.
The app makes a level 1 character with the proficiencies of the race, the class, and the background. You can change any proficiency by hand after that.
Spend and restore resources
- In the Party panel, click the character to open the character sheet.
- Click the minus button beside the HP bar to do damage, or the plus button to heal. Type a number in the field after the plus button to change HP by more than 1 with each click.
- Click a filled spell-slot pip to spend the slot. Click an empty pip to restore it.
- To heal on a short rest, use Short rest in the Time panel (see Rest). To spend one hit die outside a rest, click Spend beside Hit Dice in the Progression block, and then click Spend in the confirmation.
Change a character’s maximum HP, bonus HP, or base AC
- In the Party panel, click the pencil button on the row of the character (Edit HP and AC).
- Set Max HP. If the new maximum is lower than the current HP, the current HP goes down to match.
- Set Bonus HP (temporary). These points sit on top of the HP pool, and damage removes them first.
- Set Unarmored base AC. It applies only while the character wears no body armor.
Level a character
- In the Party panel, click Award Party XP to give XP to each character at once. To split a total instead, set Award to A total, split evenly, and the caption shows the XP that each character gets. To give XP to one character, click the three-dot button on their row and then Grant XP.
- A Level up mark shows on the party row of each character with a level to assign. Click the row to open the sheet. A banner at the top says how many levels wait.
- Click Level up in the banner (or Assign level in the Progression block). The full sheet opens with the Progression block and the Features cards. Pick the class, and click Assign. To multiclass, click Add a class instead. The list shows which classes the ability scores of the character allow.
- If the level gives an ability score improvement, click +2 ability to raise one or two abilities. To take a feat instead, click Take feat and pick a feat from the library. For a feat that is not in the list, pick Custom (name only).
- To take back the last choice, click Revert last choice beside it.
- If the level reaches the subclass level of the class, pick the subclass in the dialog that opens. To pick it later, click Cancel.
Choose a subclass
- Open the character sheet and find the Progression block.
- Click Choose (or Change) beside the class list. The button names the subclass of the class, for example Change martial archetype.
- Pick a subclass from the list. To type a name that is not in the list, pick Other… and type the name.
- Click Choose.
- If the list marked the subclass “casts spells”, open the full sheet and its Spellbook tab, and learn the cantrips and spells of the character.
Choose eldritch invocations
- Open the sheet of a warlock, find the Progression block, and click Assign level (or Add a class). Pick Warlock.
- At warlock level 3, pick a pact boon and click Choose. The app asks for the boon first, because some invocations need it.
- When the level raises the number of invocations (levels 2, 5, 7, 9, 12, 15, and 18), tick the new invocations and click Choose. The list offers only the invocations that the warlock qualifies for.
- On each warlock level, the app offers one swap. To replace an invocation, pick it under Replace, pick the new one under With, and click Done. To keep every invocation, leave both at None.
- At warlock levels 11, 13, 15, and 17, pick the Mystic Arcanum spell of the new spell level and click Choose.
- With the Pact of the Tome, tick three cantrips for the Book of Shadows. With Book of Ancient Secrets, tick two 1st-level rituals.
- Open Invocation rules under the Invocations row to read what each pick does.
A cancelled dialog leaves the boon, the invocations, or the arcanum pending. The row Warlock choices pending shows what is left, and its Choose button asks again. The GM edit buttons beside the Pact boon, Invocations, and Mystic Arcanum rows set the picks freely at any time, as a GM override of the level-up rules. To copy a ritual into the Book of Shadows later, click Add ritual on the Book rituals row.
The spells that the invocations cast appear with the other spells of the warlock. The GM reference lists what the app does for each invocation.
Equip and carry items
Only the GM adds items. A player uses, gives away, and discards what their character carries.
- Click Open full sheet on the character sheet, then the Inventory tab.
- In the form below the list, set the item type, the description, and any damage roll, AC bonus, or ability buff.
- To start from a standard item, pick it in Preset, then change the values.
- Submit the form. The item shows in the list.
- Open the Equipment tab and pick the item in its slot.
To change an item later, click the pencil on its row.
To make a healing item, set the type to consumable and fill Heals when drunk with a dice count, a die size, and a bonus. For example, 3, d6, and 0 make a Troll Draught that heals 3d6. A potion preset fills these values for you. On the sheet, Use one asks who drinks the item and rolls the heal.
Rest
A rest applies to each character in the party at once, and it moves the in-game clock forward.
- In the Session tab, find the Time panel.
- Click Short rest or Long rest.
- For a short rest, the Short rest dialog lists each hurt character with a hit die left. Type how many hit dice each one spends, and click Rest. Each die heals its roll plus the CON modifier, and spending stops at full HP. Cancel cancels the whole rest.
- For a long rest from Afternoon or Dusk, the Long rest dialog asks how long to rest. Click Rest 8 hours or Rest until Dawn. At any other time, the long rest takes eight hours with no dialog.
| Rest | What comes back |
|---|---|
| Short rest | All pact slots, and every use of a short-rest feature such as Second Wind, Action Surge, ki, or Channel Divinity. HP, spell slots, hit dice, and long-rest features such as Rage stay as they are. To heal, spend hit dice. |
| Long rest | All HP, all spell slots, and each resource. Hit dice also come back, and exhaustion goes down by one level. |
Write the story
Add an NPC
- Open the Story tab and find the NPCs panel.
- Click New NPC. The dialog starts with the tile where the party stands as the location.
- Set Name, Disposition, and Notes.
- To place the NPC elsewhere, pick a map in Location (map), then set Column and Row. Both count from 1, the same as the numbers along the edges of the map. You can also click Pick on map and then click the tile.
- To make the NPC show everywhere, pick Unplaced (appears everywhere).
- Click Add.
An NPC is a combatant, so it has hit points, a stat block, and gear. A new NPC is a commoner with 4 HP, no weapon, and no armor. Give a weapon and armor to an NPC that fights, and give more HP to a tough one.
To add an NPC to a map that the party is not on, use the NPCs list in the Encounters tab of Build mode. You can also right-click a tile in Build mode and click New NPC here.
Bring an NPC along
- Open the Story tab and find the NPC in the NPCs panel.
- Click Travels with party on its card. The NPC moves to the party tile.
- Move the party as usual. The NPC follows each move.
- When the NPC leaves the party, click Travels with party again. The NPC stays on the tile where it stands.
To move an NPC to the party once, without the toggle, click the arrow button, “Bring to the party”.
Reveal a handout
- Open the Story tab and find the Handouts panel.
- Click New handout.
- Type a Title and the Read-aloud / lore text. Add an image if you want one.
- In Shows at, pick the whole campaign, the map where the party stands, or the tile where the party stands.
- To show the handout to some players only, select their characters in Only for. To show it to each player, leave all boxes clear.
- Submit the dialog. A new handout starts hidden.
- When the moment comes, click the eye button on the handout.
Players see only revealed handouts. A handout for one tile shows only while the party stands on that tile.
To put a handout on a tile before the party gets there, select the tile in Build mode. Then click New handout on this tile in the tile inspector. The Handouts panel lists the handout when the party enters that map. When the party steps onto the tile, a message names the handout and offers a Reveal button.
Track a quest
- Open the Story tab and find the Quests panel.
- Click New quest, type the title and notes, and submit. A new quest is hidden from players.
- When the party learns of the quest, click the eye button on its row. The Player view then lists the quest with its title and status, without the notes.
- When the party finishes the quest, click the complete button in front of the title. The ring changes to a checkmark, a toast confirms, and the travelogue gets a line.
- To edit or delete the quest, click the chevron, and then click Edit or Delete at the bottom of the details.
Add objectives and links to a quest
- Click the chevron on the quest row to show its details.
- Click Objective, type the step, and submit. To keep the step off the Player view, select GM only (players do not see it).
- To mark a step done, open the quest with the chevron or the title, and then click the ring in front of the step. For a GM-only step of a revealed quest, a dialog asks whether to reveal the step to players. After the last step, a dialog offers to complete the quest.
- To change the text of a step, click the text.
- To hide or reveal one step, click the eye button on its row.
- To reorder the steps, use the up and down arrows. To delete a step, click its remove button.
- To link a map, click Link place. To link the whole map, leave the column and row blank. To link one tile, type them.
- To link a creature or an NPC, click Link creature.
- To show a linked place on the map, click its chip. The chip of a creature that stands on a map shows its tile.
The Player view shows the steps that are not GM only. It never shows the links, the notes, or a GM-only step.
Reveal the next quest on completion
- Click the chevron on the quest row, and then click Edit.
- In Unlocks, select the quests that this quest leads to, and save.
- When the party finishes the quest, complete it. The dialog lists each hidden quest from Unlocks under Also reveal, ticked.
- Clear the box of any quest the party did not learn of, and click Complete quest.
Pay a quest reward
- Click the chevron on the quest row, and then click Edit.
- Type the gold in Reward gold (gp) and the experience in Reward XP.
- In Pay, select “To each living character”, or “As a total, split evenly” for a sum that the party shares. Save.
- When the party finishes the quest, complete it. The dialog shows the reward. Change it if the party bargained for more or less, and click Complete quest. Each living character gets the gold and the XP.
Curate the library
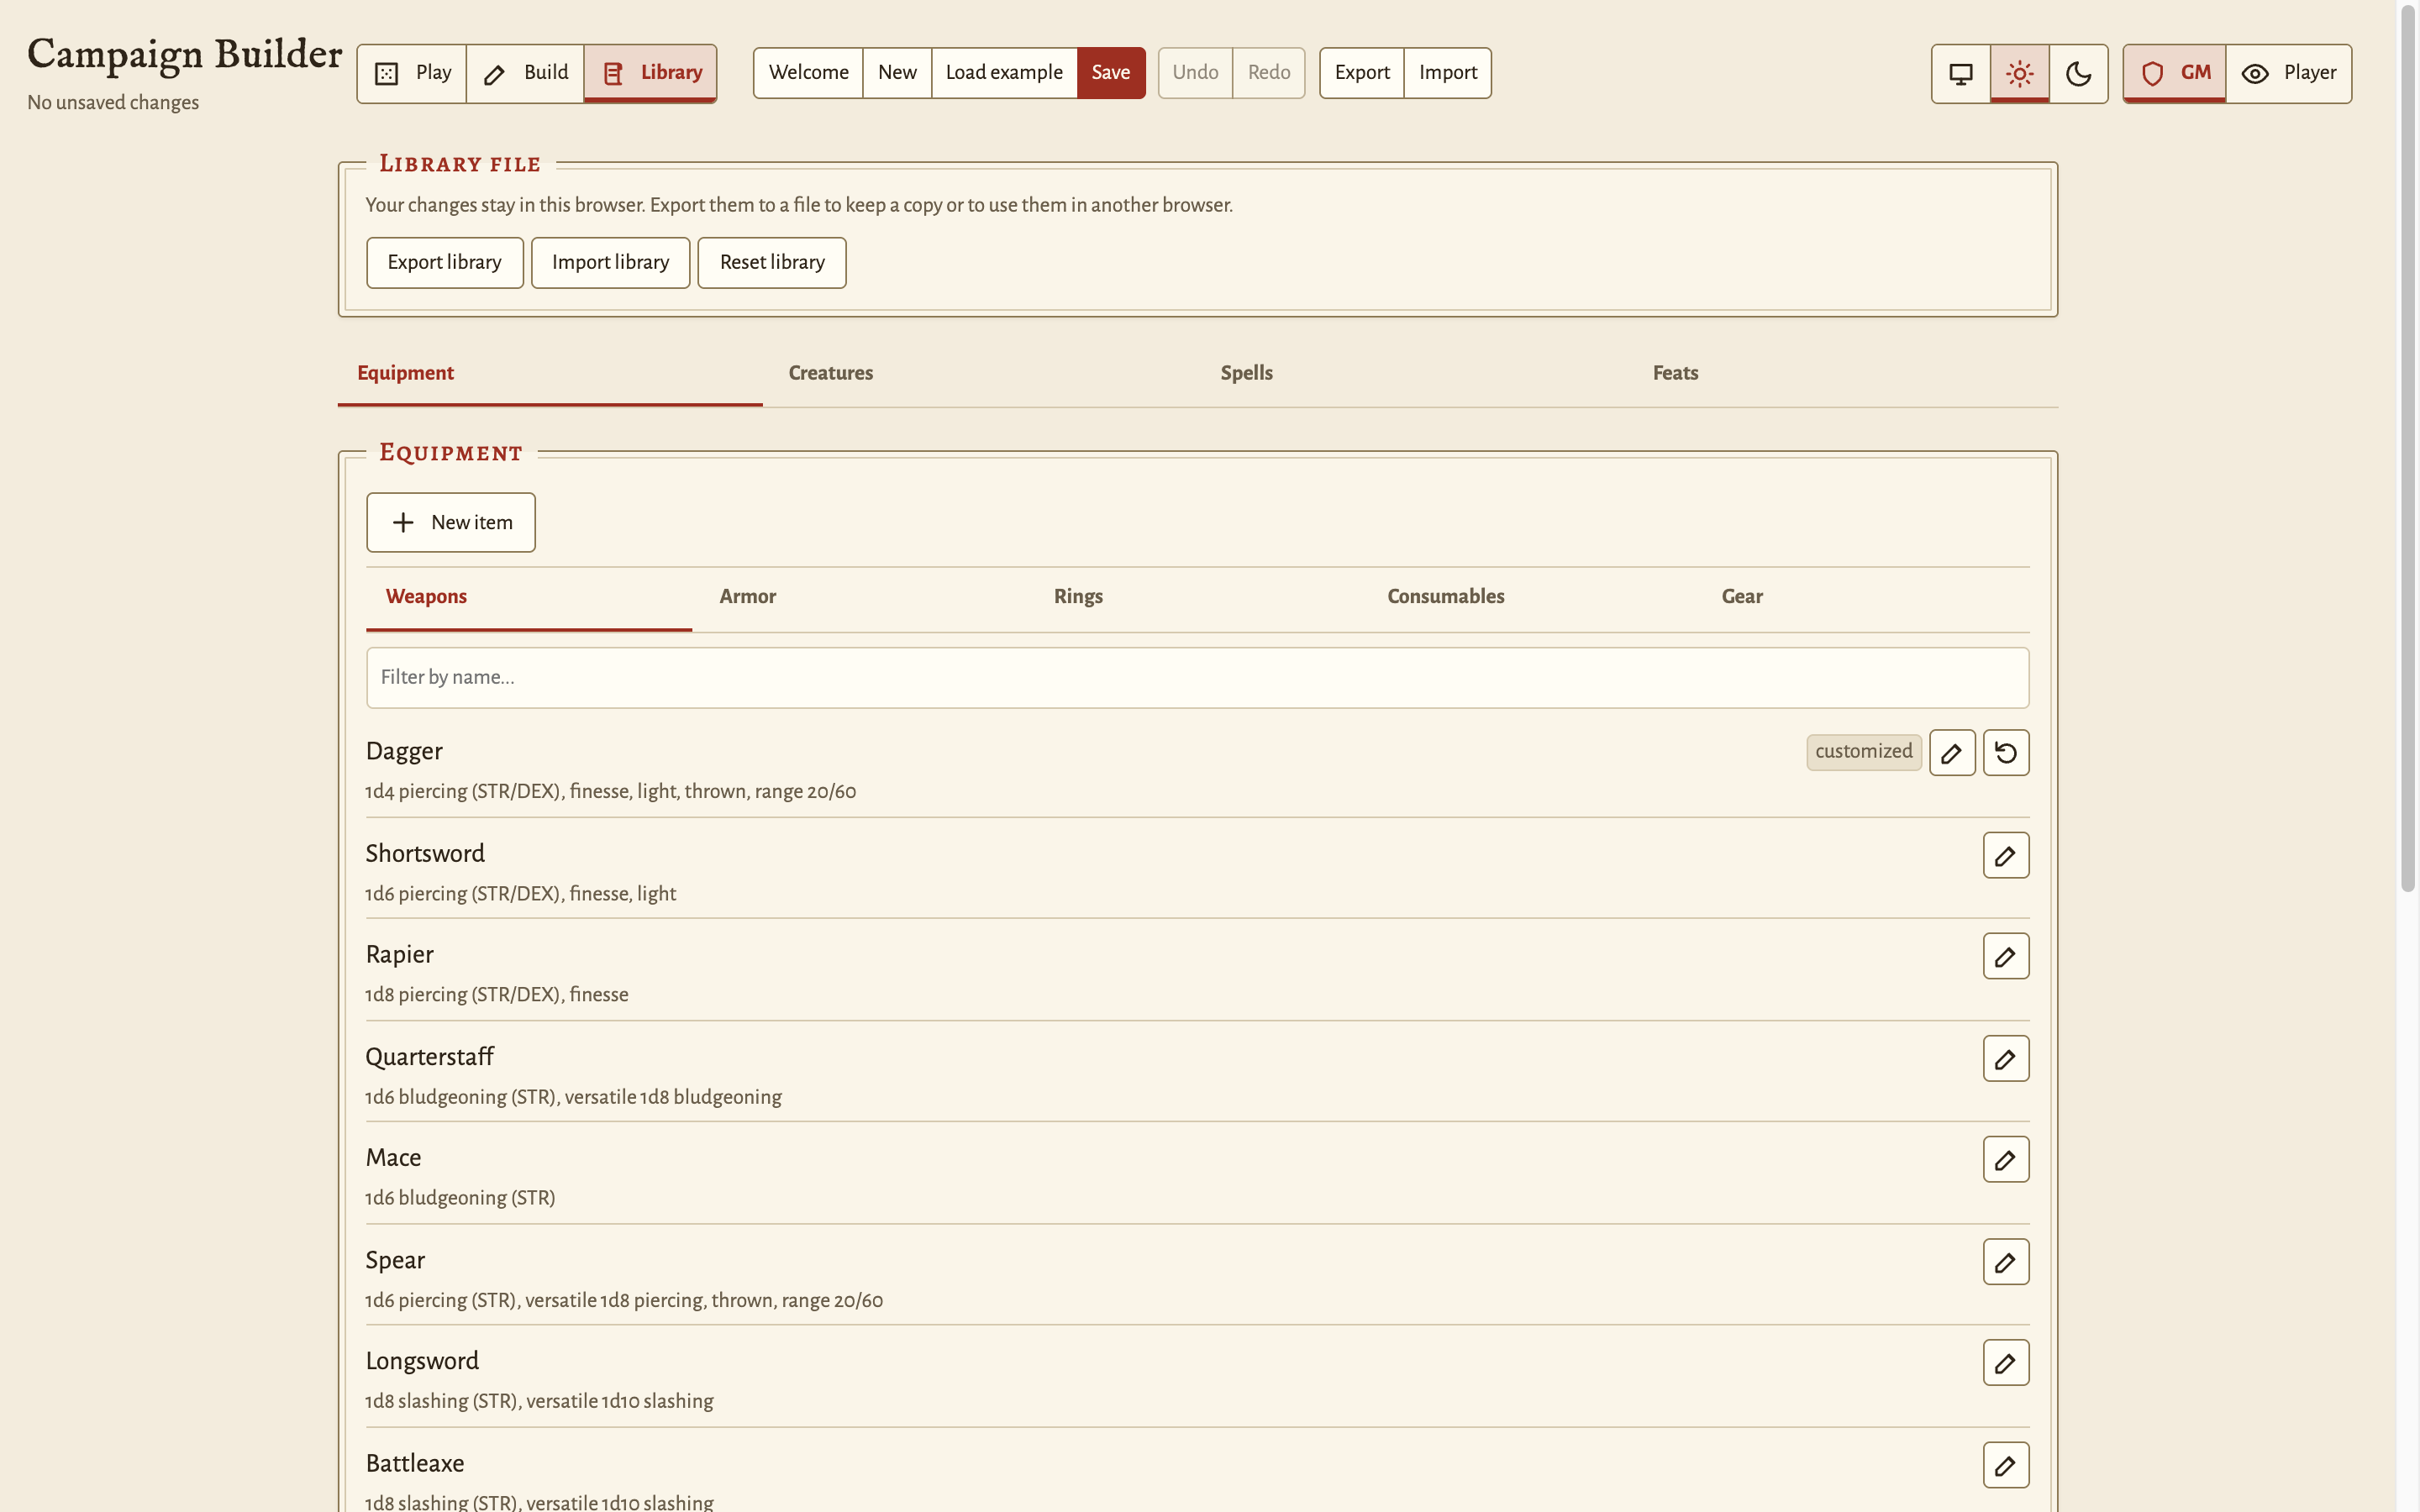
The library keeps templates that do not belong to one campaign: equipment, creatures, spells, and feats. Switch to Library mode. It has the Equipment, Creatures, Spells, and Feats tabs. The Equipment tab splits into categories such as Weapons and Armor. The Creatures tab splits into Foes and People by disposition.
Change a built-in default
- Find the entry. To find it faster, type its name in the filter box.
- Click the pencil on the row (Edit), change the values, and submit.
The row gets a customized badge. The app keeps the built-in default. To go back to the default, click the revert button on the row (Revert to default).
Add your own entry
- Click the add button of the tab: New item, New creature, New spell, or New feat.
- Fill in the form and submit it.
If the entry has the same name as a built-in default, it replaces that default. For equipment, both the name and the type must match. Any other entry is added beside the defaults with a custom badge. To delete a custom entry, click the remove button on its row.
In the Creatures tab, Add to campaign on a row places a copy of that creature in the current campaign.
Add a missing spell
The built-in list has 111 spells. A spell that you write uses the same fields as a built-in one, so you do not need to change any code. Curated spells says what the app can and cannot apply for you.
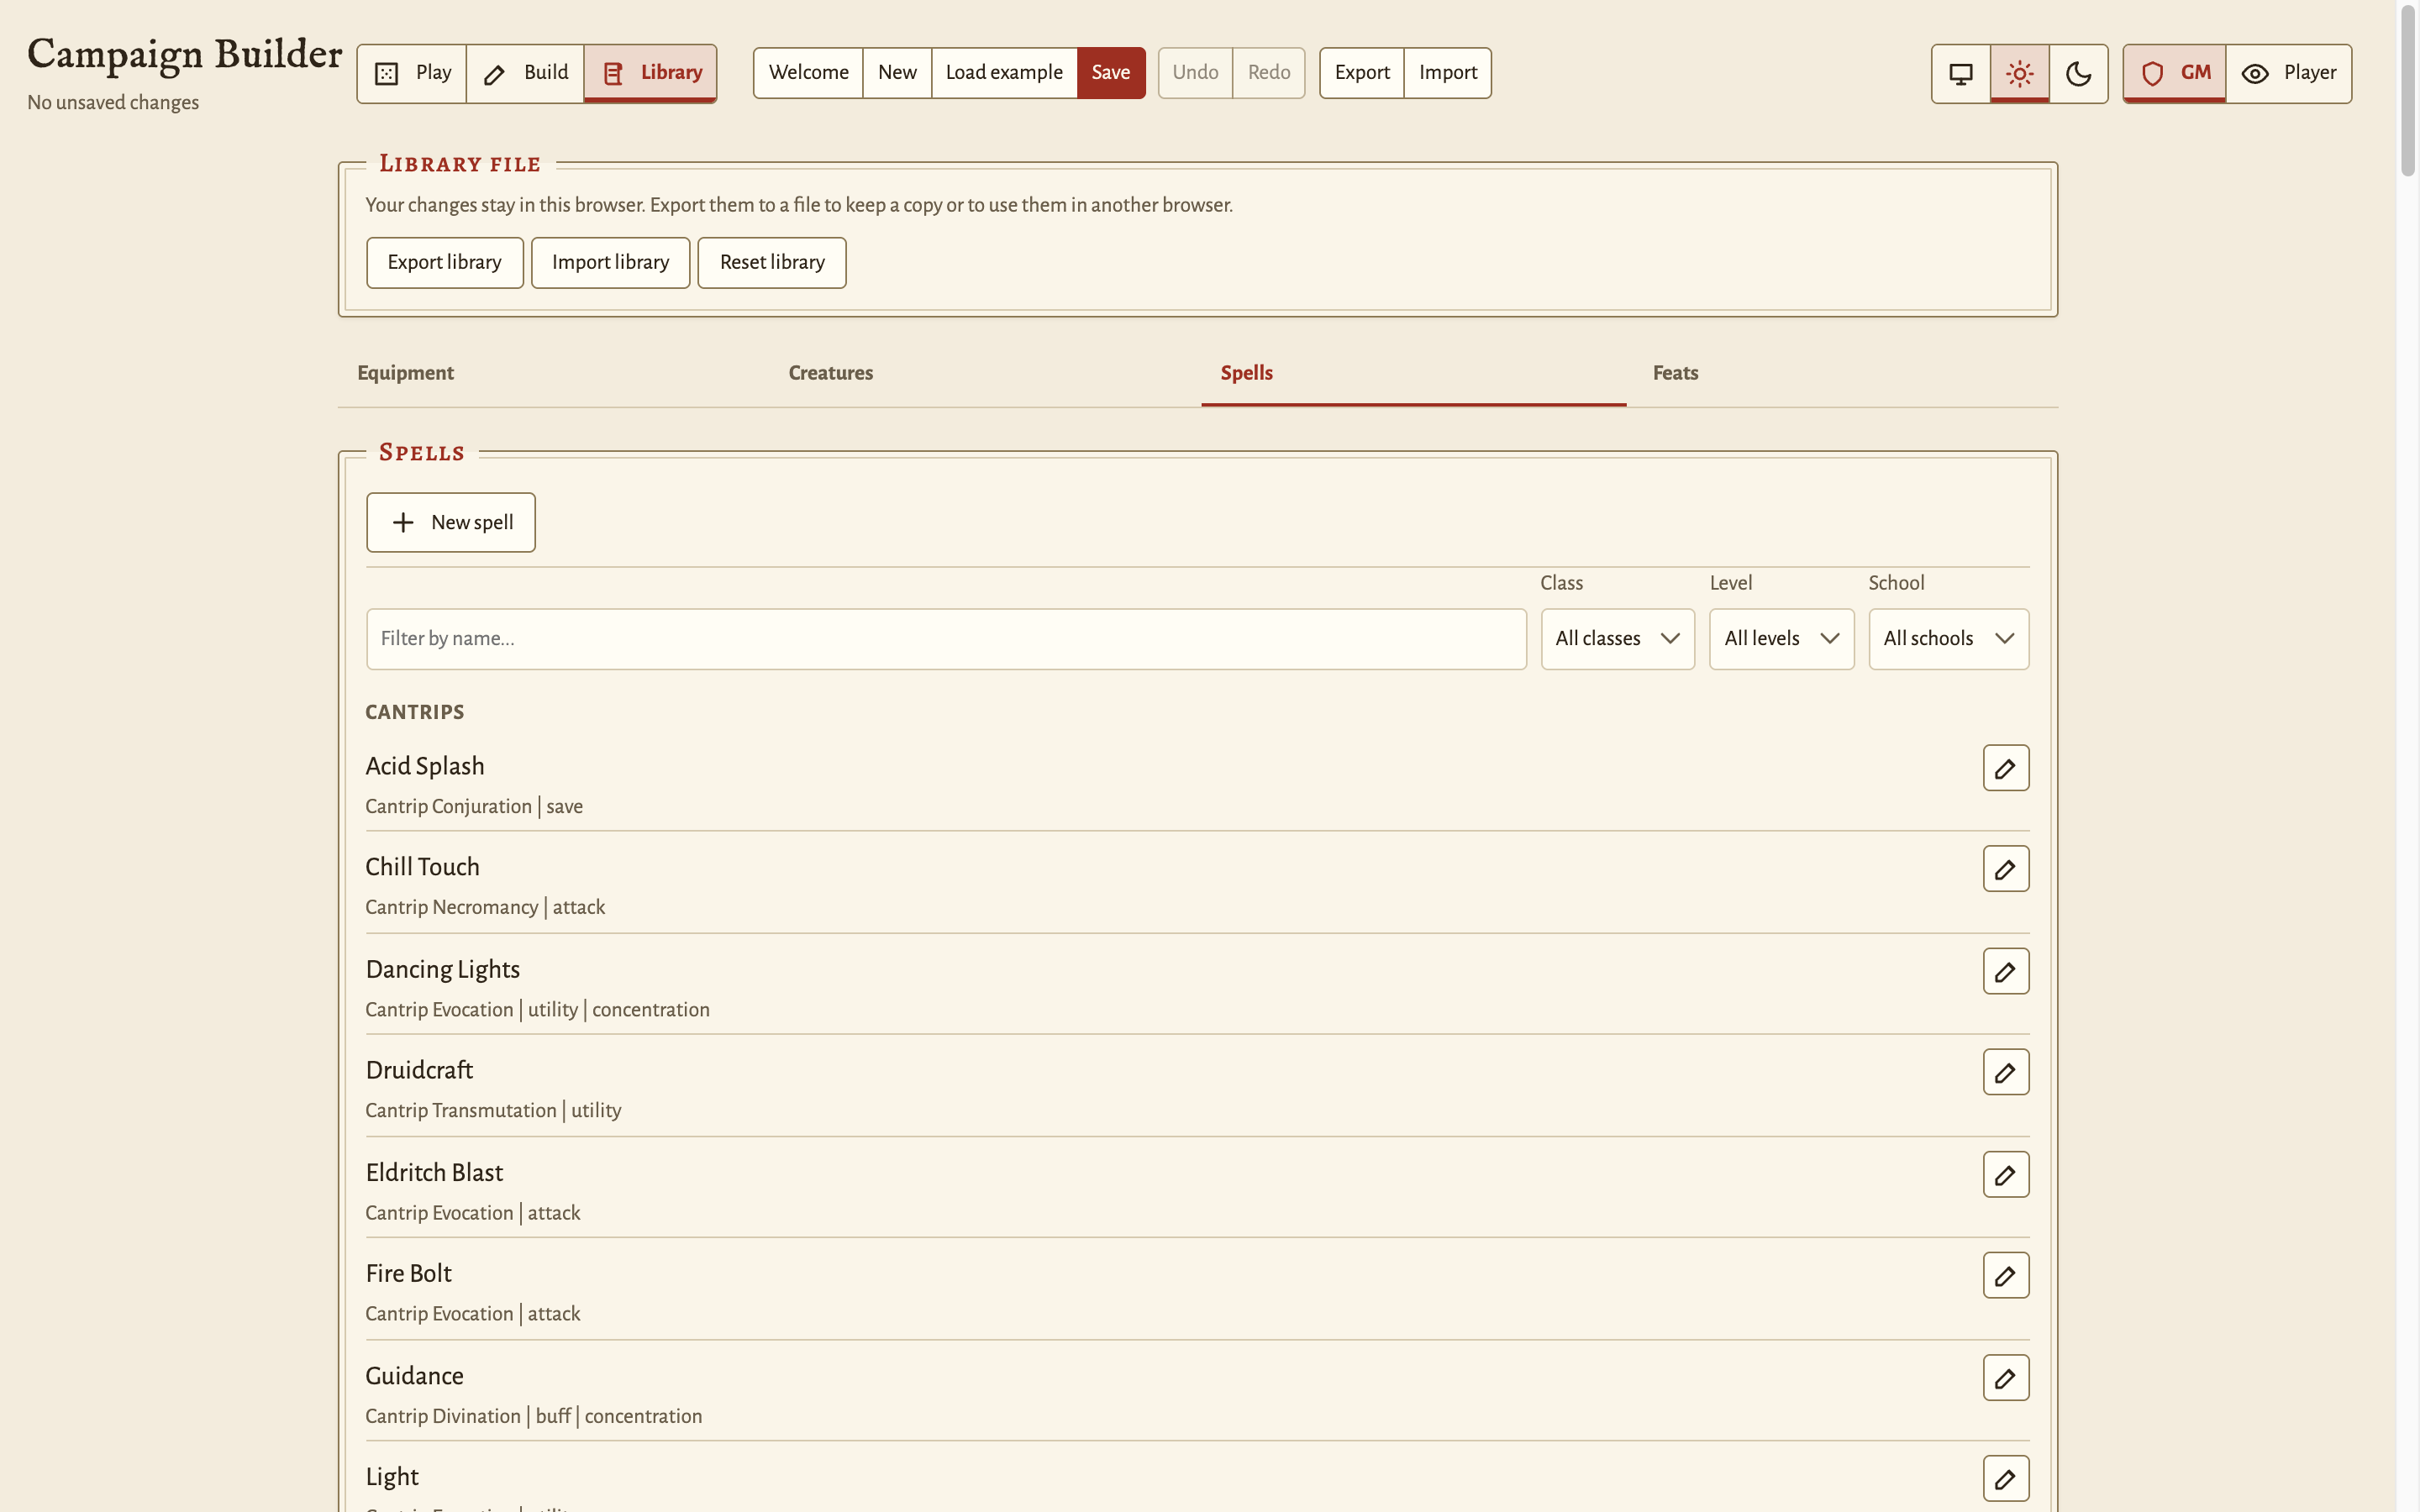
- In Library mode, open the Spells tab.
- Click New spell.
- Pick the effect kind:
attack,save,heal,buff,summons, orutility. - Set how the spell scales: by slot level, or by caster level for a cantrip.
- Submit the form.
A heal spell can also end condition chips. Type chip names, separated by
commas, in Ends for the chips that the spell always ends, or in Ends one
of for the chips of which it ends one. When the target has more than one
chip of the second list, the app asks the caster which one to end. The name
Exhaustion ends one level of exhaustion. Leave the healing dice empty for a
spell that heals no HP, such as Lesser Restoration.
For a buff that changes attack rolls, use the attack row of the form. A
save with a condition and an attack whose hit imposes a condition
show the same row for the chip that they leave, as Vicious Mockery and
Guiding Bolt do.
Holder attacks slants the attack rolls of each target, and Attacks
against slants the attack rolls made against it. To limit the second
slant to some attackers, type their creature types in Only by types,
split by commas. Tick One attack only when the chip ends after the first
attack roll it slants.
The resist row sits under the attack row. Type damage types in Resists,
split by commas, for a chip that resists them. Tick Nonmagical weapons
for a chip that resists bludgeoning, piercing, and slashing from a
nonmagical weapon, as Stoneskin does. A buff also has Caster picks one
of. Type damage types there, split by commas, and the cast dialog asks
the caster for one of them, as Protection from Energy does.
An attack whose hit imposes a condition can leave a second chip on a
target of some creature types only, as Chill Touch does on an undead target.
Tick Extra chip on some creature types, then tick the types under
Extra chip on and type a name in Extra chip name. The form drops an
extra chip that has no name or no ticked type. Pick when the chip ends in
Extra chip ends at. Stops healing keeps the holder from regaining hit
points, and Attacks the caster at disadvantage gives the holder
disadvantage on its attacks against the caster. The indented group also has
its own attack and resist rows. The extra chip has no save, and a hit on a
target of another type leaves only the first chip.
If the rules of the spell need more than the app can apply, make it a
utility spell and write the rules in the description. Then apply the
rules yourself at the table.
A buff spell can add damage dice to hits. The Hit dice, Die, and
Type fields set the dice, and Same as the hit takes the damage type
of the weapon or spell. Weapon hits only leaves spell attacks out.
Marks a foe puts the chip on a foe instead of an ally, and only the hits
of the caster against that foe add the dice. Hex is not in the SRD, but you
can write it this way:
- Set the casting time to a bonus action, the range to 90 feet, and the duration to up to 1 hour with concentration.
- Pick the
buffeffect kind. - Set Hit dice to 1, Die to d6, and Type to necrotic.
- Tick Marks a foe, and leave Weapon hits only clear, because Hex counts every attack of the caster.
- Tick Repeats on later turns, and set Each repeat costs to a bonus action. When the target drops to 0 HP, the caster moves the curse with Repeat (no slot).
- Write the disadvantage on ability checks of one ability in the description, because you apply it at the table.
Move your library between browsers
- In the Library file card at the top of Library mode, click
Export library. The browser downloads
campaign-library.json. - Save that file over
library/campaign-library.jsonin the project folder. A new browser or a new clone loads it at startup. - To load a library file into this browser instead, click Import library and click Replace in the confirmation.
- To remove every customization, click Reset library and confirm. Export a copy first if you want to keep one.
A campaign export also contains your library. To move both at once, import the campaign file in the other browser. Use the Library file card when you want the library without a campaign.
Export the map as an image
- Switch to Build mode and open the map.
- In the Paint tab, click Export PNG in the Tools card.
The browser downloads the map as a PNG image, for printing or for a virtual tabletop. The image ignores fog. A browser limits how large an image can be, so a large map comes out at a smaller tile size.